Sdw100
Member
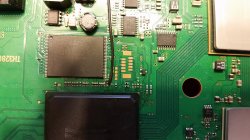
This is only to help know were to solder and what to solder to where:
Please refer to @joonies guide in first spoiler for software setup
Things to note:
- * soldering is required*
- Shave E3 clip
- I wont be explaining tear down
- Please use joonie's guide HERE
- Ps3 unit capable of cfw
- 2nd hdd
- E3 flasher limited or estata dock
- Soldering knowledge
- Soldering flux
- Thermal comound
- 99% rubbing alcohol
- Wire
- Time/care
- Multimeter
- Knife/razor blade
- Permanent damage
Pros/cons:
Pros
run clean OFW
Run two cids
Run two cfw
Run cex and dex
No risk of brick as long as kept valid dump
Cons
Setup install x2 each ofw fw release
run clean OFW
Run two cids
Run two cfw
Run cex and dex
No risk of brick as long as kept valid dump
Cons
Setup install x2 each ofw fw release
Hi
so let's begin with the basics u all now how to install and take backups of your " ps3 slims" flash memory if not please refer to the forums search bar..
So first solder two wires to you E3 clip using SBE and SBCE contacts
connect your clip in correct orientation check online for your motherbourd as the nor chips are positioned differently depending on model number
As you can see the multimeter is reading 0.00 full connection between A/B this we need to break u will more than likely get a reading once you cut the trace between then but it will be resistance feedback so long as u dont read 0 you should be good
This contact on the left is Point A this is where we solder SBCE to
#1
While E3clip is attached to nor chip and flasher but wires NOT SOLDER and trace cut set switches 000000 and put your multimeter on SBE and on GND THERE SHOULD BE NO CONTINUITY
NOW SET SWITCHES 100000 "FLASH FUN MODE"
YOU SHOULD HAVE CONTINUITY
#2

set switches 000000 place meter probe on SBCE wire from E3 ribbon cable and other probe on CE "Refer to motherbourd diagrams" while set to OFW mode you SHOULD continuity
Now set switches to 010000 CFW mode you shoul NOT have continuity


While E3clip is attached to nor chip and flasher but wires NOT SOLDER and trace cut set switches 000000 and put your multimeter on SBE and on GND THERE SHOULD BE NO CONTINUITY
NOW SET SWITCHES 100000 "FLASH FUN MODE"
YOU SHOULD HAVE CONTINUITY
#2
set switches 000000 place meter probe on SBCE wire from E3 ribbon cable and other probe on CE "Refer to motherbourd diagrams" while set to OFW mode you SHOULD continuity
Now set switches to 010000 CFW mode you shoul NOT have continuity
Apply new thermal compound on rebuild REMEMBER to much will act as an insulator only a thin spread is needed
Every one has there own method go with what u feel comfortable with..
E3 team
@Joonie/ for guide
@littlebalup/ help with issues
@baileyscream
@playerkp420
@nCadeRegal
Also check this MOD with e3 flaher/linker by @WTF-IGO
http://www.psx-place.com/threads/my_ps3-slim-e3-flasher-mod.12269/#post-70397
Reverting back to standard cfw/ no fast db..
Ok this is pretty simple all you need to do is flash your E3 nor back to PS3's nor flash either via:
- Micro sd
Code:
switch setting 000000 - Flash directly
Code:
switch setting 100100
And check cfw HDD boot's on ofw mode "000000"
Now remove the soldered cables and E3 flasher.
Now bridge points A/B back together
REBIUILD
Things to add:
Reverting back to standard CFW- More detail
Info and images to be added as i go
")
Last edited: