PS3 [GUIDE] Unbrick a PS3 after an unfortunate PS3Xploit flash

Have any idea about it? Any guess ? Any method of checking tristate point?
Is a pin od the southbridge, so... incase the southbridge of slims and superslims is similar (or have a similar pinout) you could compare them with a multimeter

Another hint is that tristate line should have a "testpad" because is intended to be connected to a jig-pin-machine at factory or service repair centers

The testpad should be located at bottom side of the motherboard (the opposite side of CELL/RSX), and should be located very close to southbridge
 
Last edited:
I have bricked my PS3 model CECH-2503B. The firmware version is 4.82 with min ver 3.60. I was performing jailbreak with PS3Xploit method and suddenly there was a power cut. When I turned on the PS3, it is turning off itself after 3 seconds. After that I had three dumps with E3 flasher bkpps30.bin, bkpps31.bin and bkpps32.bin. I checked all the three dumps with PS2 dump checker and all the dumps are good. I flashed a dump again to revive my PS3. But it is still the same turning off after 3 seconds. I followed the tutorial and byte swapped it and flashed again but still its the same. Can anyone please suggest me a method to bring back my PS3 alive.
 
I have bricked my PS3 model CECH-2503B. The firmware version is 4.82 with min ver 3.60. I was performing jailbreak with PS3Xploit method and suddenly there was a power cut. When I turned on the PS3, it is turning off itself after 3 seconds. After that I had three dumps with E3 flasher bkpps30.bin, bkpps31.bin and bkpps32.bin. I checked all the three dumps with PS2 dump checker and all the dumps are good. I flashed a dump again to revive my PS3. But it is still the same turning off after 3 seconds. I followed the tutorial and byte swapped it and flashed again but still its the same. Can anyone please suggest me a method to bring back my PS3 alive.
Byte swap bkpps30.bin then patch bkpps30_swap.bin with ROS patch from OP.
After patching byte swap again, then flash it to NOR.
 
Byte swap bkpps30.bin then patch bkpps30_swap.bin with ROS patch from OP.
After patching byte swap again, then flash it to NOR.

Don't need to byte swap to patch E3 dumps. The patchers takes care of that.

I have bricked my PS3 model CECH-2503B. The firmware version is 4.82 with min ver 3.60. I was performing jailbreak with PS3Xploit method and suddenly there was a power cut. When I turned on the PS3, it is turning off itself after 3 seconds. After that I had three dumps with E3 flasher bkpps30.bin, bkpps31.bin and bkpps32.bin. I checked all the three dumps with PS2 dump checker and all the dumps are good. I flashed a dump again to revive my PS3. But it is still the same turning off after 3 seconds. I followed the tutorial and byte swapped it and flashed again but still its the same. Can anyone please suggest me a method to bring back my PS3 alive.

Patch your dump with the 4.82 CoreOS then flash it back to your NOR.
 
Hi @littlebalup , thanks for your tutorial but I had one question about a 4311C bricked console, see..

The PS3 got full bricked after trying to install what I believe was ps3xploit 4.82, and the person who did it - I believe - could have chose the wrong memory type at the moment of the installation of the exploit. That's what I think it happened to this console, so my question is, and from what I read and watch on videos, it is possible to follow this tutorial by using the NOR tristate jumper and the E3 flasher to try to fix or restore the original NOR data?

I just received the E3 Flasher and I know it needs the Samsung update, but the console is dead, just no light off after trying to power on the console. The other problem I see, is that my board is a little different from the one you have (I saw your tristate pic https://thumb.cloud.mail.ru/weblink/thumb/xw1/46t3/vfbGnhYRo/20160515_022712.jpg ) Is that correct?

Mine looks like this:
https://i.imgur.com/G8RzXON.jpg
board RTX-001

The tristate of your board, could be the same of my board? Will this plan even work for me? Thanks.

Yes, it looks like the same tristate point.
That console is not compatible for jailbreak so it will brick even if selecting the correct flash type.
Following that tut should solve your issue.
 
Yes, it looks like the same tristate point.
That console is not compatible for jailbreak so it will brick even if selecting the correct flash type.
Following that tut should solve your issue.
Oh so that was the cause. Thanks for the quick answer, I'll be posting the results on this thread because I have found nothing about 4xxx except for this tutorial.
 
I mistakenly brick my PS3 CECH 2504B. Please, I need an assistance on how to fix it. Preferably, a video guide will be of great help. Thank you
 
So, after fighting to death with that damn E3 clip, my PS3 4311C is alive again, and all the credit goes for @littlebalup and his awesome tutorial. How do you even..?

Anyways, thank you so much! I'll now post some pics of the NOR tristate jumper (very important for dead super slims) and captures of the software tools I used with this tutorial.

72JmAkN.jpg

ggb0iPC.jpg


Trying to put the E3 clip on a super slim is almost a nightmare, because you have to make pressure in a place where you can't use a pressure tool like in fat or slim models, the NOR is literally hidden from the light because is too near to the main processors.

For the clip, I used the pressure of my hand, and then, AND ONLY THEN, a coin. Make sure it is tight after putting the main processors metal and screws. Then pray to be able to update the damn E3, and that's all. I really didn't have any problem in making the new dump, once again, thanks to littlebalup.

The result of this great experience:

DCzy1fe.jpg

--------------------------------------------------------------------------------------------------------------------------------------------
Dump before patching:

EmTEDJB.jpg

ao8J8AR.jpg

------------------------------------------------------------------------------------------------------------------------------------------------------
After patching:

spIeNZ7.jpg


B45gvbi.jpg


FIN.
 
Nor Tristate solder pad came off from the motherboard while trying to solder Tristate to GND. Is there a way to solder the Tristate pad again. Is there any other alternative to Trisate point? Can someone please help me.

Board JTP-001
 
Last edited by a moderator:
Nor Tristate solder pad came off from the motherboard while trying to solder Tristate to GND. Is there a way to solder the Tristate pad again. Is there any other alternative to Trisate point? Can someone please help me.

Board JTP-001
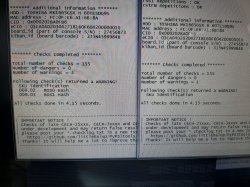
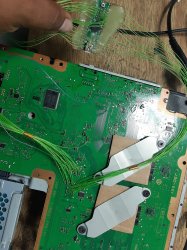
https://www.psx-place.com/attachments/qqwi6bwwrliu3i8r4sdfna-png.13816/
qqwi6bwwrliu3i8r4sdfna-png.13816

You need to solder the wire in that little brown square, the other joint to ground. I recommend you to watch some videos about how to use the solder, and use flux, because you can damage the board again when taking the jumper off.

https://www.psx-place.com/threads/ps3-brick-tristate-point-fell-with-solder.21326/

Oh, and this is the source. Check it.
 
Last edited by a moderator:
Im have ps3 jsd-001 im patch and not work

20190921_135731.jpg


And patched pypatcher

15690891025179007853156135639065.jpg

Any can helpme

its is me log

Im using teensy
 

Attachments

  • 15690896023112574609946318609477.jpg
    15690896023112574609946318609477.jpg
    5.3 MB · Views: 225
  • omar.bin.checklog.txt
    omar.bin.checklog.txt
    7.6 KB · Views: 221
  • 15690898746244199071049345714983.jpg
    15690898746244199071049345714983.jpg
    2.2 MB · Views: 235
Last edited by a moderator:
Im using teensy
From what I see in the PS3DumpChecker test you did, you're ready to flash that patched dump on the NOR. Once you flashed it, take apart the tristate jumper. I'm not sure if you can test your PS3 with the teensy still connected. You should check that, because I never used it.
 
With the teensy, if the teensy is powered via the console and not via the usb+regulator, you must release the tristate with the "Release" command in order to be able to boot. If doubt, the best way is to desolder the tristate wire.
 
Thank you Elgris for the great help. I thought there were no other options to get the tristate working. You saved my life and eventually my PS3. I followed the instructions and soldered the alt to the ground. I could get the PS3 running then flashed the working dump for my PS3. Its back to life again. My humble thanks to Lious and Littlebalup for the wonderful tutorial without which the PS3 would have been lying dead.
 
hello, I need some help, I used the ps3xplot fash writter on Cfw rebug 4.85 slim 25xx, and now it turns on for 1 second and loses energy, I have the e3 flasher but not with a backup of the nor, I read that it has to be done dump and use non-fsm patch but I don't know how to do it and where to get the patch, if you could explain to me how to do it
 
Back
Top