PS3 Help with GLOD, can hear sound but no display

Dear all,

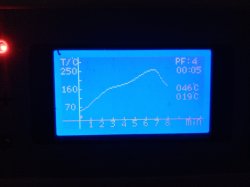
I have got a fat model ps3 with no BD CFW installed 4.84 overflow edition. at first i got artifacts after sometime turning on the console. I opened and cleaned the dirty console. added 330 uf 4 capacitors parallel with NEC/Tokin capacitors the rsx side with no luck and still getting the artifacts after sometime. Now when i turn on the console just glod and no display on HDMI or av output. The only way i could get the the console working again with a display and normal behavior is to push my hand with no BD ON RSX and force it down side and then press the power button. Console boots normally without issues, the second i release my hand from the rsx chip with force the console again freezes and artifacts. I think the issue is with rsx bga(soldering points) with the main board. How can i fix this ? Will heating up the chip after delid would fix the issue ? or i will have to reball it ?
 
You should send your console to some trustable electronics repair shop, as a simple reflow could fix your issue but must be done by an expert, with the appropriate tools and at the right temperatures.

Reballing is another possibility, but should be considered as a "last resource". It's very difficult to perform and requires the correct BGA stencil, desoldering of the RSX and deep clean of the soldering remnants.

Good luck!.
 
Here isn't that much of an expert to do it here. Someone please advise how can i fix this by heating it, i have a heat station with a friend having laptop workshop in the market. Last time when i tried on him he blew one of those 4 memory chips located on the each corner of the rsx chip. This time i may personally try it myself. I am good at repairing electronics. Deliding cpu and rsx is really easy for me. Changing nec tokin capacitors too with tantalum ones. By the way i think i must avoid to heat those chips again but will just have to heat the sides of the rsx, and shoud i also avoid to heat the die ? Any comments will be appreciated.
 
Sounds like it's on its last legs to be honest, artifacts and lines not good.. I mean you could try to reflow as last resort or make a shim to allow more pressure on the rsx chip when clamps are tightened, but if you do reflow use a decent flux and shield the motherboard board except the rsx chip and don't over heat it keep steady temp kite and not longer then 2 /3 mins and allow to cool slowly. Goodluck
 
Sounds like it's on its last legs to be honest, artifacts and lines not good.. I mean you could try to reflow as last resort or make a shim to allow more pressure on the rsx chip when clamps are tightened, but if you do reflow use a decent flux and shield the motherboard board except the rsx chip and don't over heat it keep steady temp kite and not longer then 2 /3 mins and allow to cool slowly. Goodluck

You are right, flux is a must for dried solders, but what do you exactly mean by shim ? The screws are full tightened on rsx chip without any luck, i put 4 coins on each corner and then tightened the screws with no luck. The only way i experience a normal console is by hand force downside the rsx chip. Do you know any way to pressure the rsx chip with those screws in order to avoid reflow ?
 
@sandungas

Any help will be appreciated?
Hi when I suggested a shim I mean like a spacer or coin like you have tried, I think it maybe time to attempt a reflow at this point as a last resort but I really not sure how long this would last if it is successful?, I think it is a gpu issue or gpu bga connection issue, if your not to bothered you could just reflow only the rsx to see if it makes any difference
 
Hi when I suggested a shim I mean like a spacer or coin like you have tried, I think it maybe time to attempt a reflow at this point as a last resort but I really not sure how long this would last if it is successful?, I think it is a gpu issue or gpu bga connection issue, if your not to bothered you could just reflow only the rsx to see if it makes any difference
I am also convinced to try a reflow myself with my own hands, do you have any best idea how to do it along with flux to avoid any unwanted damages ? Or can you prefer a link to a video where one can use a heat station to do this procedure? I think the main board must be 100% kept flat while performing this project, Lol
 
I am also convinced to try a reflow myself with my own hands, do you have any best idea how to do it along with flux to avoid any unwanted damages ? Or can you prefer a link to a video where one can use a heat station to do this procedure? I think the main board must be 100% kept flat while performing this project, Lol
I personally have a professional reflow oven, and have not used a hot air device,

You can use a flux like topnik rf800 smd

At home as a non professional maybe you can use some foil of similar to shield the motherboard leaving a square around the rsx chip, I'd personally warm the motherboard up to about 110 degrees for and hour first remove any moisture apply the flux under the rsx chip until it comes out the other side both ways and heat the top of the rsx chip to about 230/240 degrees for max of 2.45 - 3 minutes to melt the solder balls underneath and allow it to cool as slow as possible, it's really hard to get the temps to seconds step without a controlled professional reflow oven but this is the best I can advise as long as you realise it may not work and could make it worse and your happy to accept it is a last resort. Good luck hope this helps.
 
I am also convinced to try a reflow myself with my own hands, do you have any best idea how to do it along with flux to avoid any unwanted damages ? Or can you prefer a link to a video where one can use a heat station to do this procedure? I think the main board must be 100% kept flat while performing this project, Lol
Definitely try to keep the motherboard flat and heat evenly to try to avoid any hot spots or warping.
 
Definitely try to keep the motherboard flat and heat evenly to try to avoid any hot spots or warping.
this is a profile I have used previously with success on Ps3 with bad rsx bga connections, you will also have to delid the chips after you have tested and if it is successful and apply new thermal paste due to the extreme heat needed will dry the original thermal paste
 

Attachments

  • IMG_20211118_143349.jpg
    IMG_20211118_143349.jpg
    2.4 MB · Views: 80
@sandungas

Any help will be appreciated?
The pressure test you made (and the video artifacts) are like a confirmation that there are problems in the BGA solders, but is not a 100% confirmation, is just orientative
Also, keep in mind usually in that pressure tests we are bending the wole motherboard a bit... so it could happen that you press on "spot A" but the motherboard bending fixes a connection in "spot B" (located far away), the best thing you can do to get a better idea if you are having this effect is to repeat the pressure test a lot of times pressing in different places
Also, keep in mind the heatsink metal blocks of CELL and RSX are connected to each others, when you press the heatsink you are pressing both

Btw, the correct way to increase pressure is to bend the clamps, note the clamps have a bending, that bending have a "spring" effect. The coins are a bad idea, please stop spreading nonsensic repair methods :D
Incase of adding some custom piece the material should be rubber or plastic (because are not electrical conductive), but NEVER METAL (neither vegetals, ive seen people adding a wood stick from a ice cream)
But in your case the pressure is not going to fix the problem, maybe it will do for a few days but the "broken" BGA solders degrades and in few weeks or a month it will stop working

The @mozznick suggestions are good, i also suggest you to protect the motherboard with kapton or aluminium foil... the goal with the aluminium foil is to create a "air chamber" in between the aluminium and the motherboard
You need to "pre-heat" of the whole motherboard at a low speed, you can use a gas oven for it, but it needs to have an display to show the temperature accuratelly
After that drop lot of flux at the borders of RSX, and move the motherboard vertically to allow the liquid to enter under RSX, and use a hot air gun to increase the temperature of RSX a bit over
And apply the hot air in a angle in circles all around... trying to force the hot air to go under RSX
At that point you are not going to know which temperature you are applying... ive seen people telling they does it until the flux starts "evaporating"... like an smoke... if you see the smoke it means the chicken is ready :encouragement:
 
If he got artefacts to screen that ic is still good, is just bga not making contact. Right flux and right profile for reflow/reball will make it work back. Do we have any errors from uart on this board or do you go old way by multimeter?
 
I personally have a professional reflow oven, and have not used a hot air device,

You can use a flux like topnik rf800 smd

At home as a non professional maybe you can use some foil of similar to shield the motherboard leaving a square around the rsx chip, I'd personally warm the motherboard up to about 110 degrees for and hour first remove any moisture apply the flux under the rsx chip until it comes out the other side both ways and heat the top of the rsx chip to about 230/240 degrees for max of 2.45 - 3 minutes to melt the solder balls underneath and allow it to cool as slow as possible, it's really hard to get the temps to seconds step without a controlled professional reflow oven but this is the best I can advise as long as you realise it may not work and could make it worse and your happy to accept it is a last resort. Good luck hope this helps.
It is surprising how you used reflow oven for this procedure, we don't have such a device in our third world country, BTW your advise is really convincing and great. i will try to follow what you advised. 3mins will be enough for this procedure i think. Last time we blew one of the memory chips located at the corner of the RSX chip. we didn't know that thing will blew in high temperatures and you can hear the loud sound of the explosion. Lol

will definitely avoid those chips while heating the rsx this time. Thanks for your time
 
this is a profile I have used previously with success on Ps3 with bad rsx bga connections, you will also have to delid the chips after you have tested and if it is successful and apply new thermal paste due to the extreme heat needed will dry the original thermal paste
i can't understand what is this profile used for ? i think it shows the temperature graph, correct me if i am wrong.

Nowadays i am a master of deliding the rsx chip and the cell chip. it is now like drinking a glass of water for me. either for those who have the correct tools for it. Without perfect tools, it was a really and frustrating job to be done.
 
The pressure test you made (and the video artifacts) are like a confirmation that there are problems in the BGA solders, but is not a 100% confirmation, is just orientative
Also, keep in mind usually in that pressure tests we are bending the wole motherboard a bit... so it could happen that you press on "spot A" but the motherboard bending fixes a connection in "spot B" (located far away), the best thing you can do to get a better idea if you are having this effect is to repeat the pressure test a lot of times pressing in different places
Also, keep in mind the heatsink metal blocks of CELL and RSX are connected to each others, when you press the heatsink you are pressing both

Btw, the correct way to increase pressure is to bend the clamps, note the clamps have a bending, that bending have a "spring" effect. The coins are a bad idea, please stop spreading nonsensic repair methods :D
Incase of adding some custom piece the material should be rubber or plastic (because are not electrical conductive), but NEVER METAL (neither vegetals, ive seen people adding a wood stick from a ice cream)
But in your case the pressure is not going to fix the problem, maybe it will do for a few days but the "broken" BGA solders degrades and in few weeks or a month it will stop working

The @mozznick suggestions are good, i also suggest you to protect the motherboard with kapton or aluminium foil... the goal with the aluminium foil is to create a "air chamber" in between the aluminium and the motherboard
You need to "pre-heat" of the whole motherboard at a low speed, you can use a gas oven for it, but it needs to have an display to show the temperature accuratelly
After that drop lot of flux at the borders of RSX, and move the motherboard vertically to allow the liquid to enter under RSX, and use a hot air gun to increase the temperature of RSX a bit over
And apply the hot air in a angle in circles all around... trying to force the hot air to go under RSX
At that point you are not going to know which temperature you are applying... ive seen people telling they does it until the flux starts "evaporating"... like an smoke... if you see the smoke it means the chicken is ready :encouragement:
Thanks for your reply, i am sure i am not using that much force to couple it with cpu side bending but just rsx can feel it. Okay will not use the coin trick anymore, but can you give me or explain what do you mean by or how can i perform the ice cream wood trick or any other non-conductive material trick ? where should place it ? under bending clip or under the plate between the spreader and the big mainboard plate ?
I don't own a gas oven in my country, so no luck with it.
I understand how to apply the flux with temperature and rotate the board vertically in order to make every leg oily with this flux. also can you tell me how much heat with what timing should be applied in order to re-solder those broken legs ?
 
If he got artefacts to screen that ic is still good, is just bga not making contact. Right flux and right profile for reflow/reball will make it work back. Do we have any errors from uart on this board or do you go old way by multimeter?
you are right, i am also convinced that just the problem is with bga contact, as with pressure from upwards, there is no other issue and i have a normal console for gaming and etc. No any other errors from my experience.
 
It is surprising how you used reflow oven for this procedure, we don't have such a device in our third world country, BTW your advise is really convincing and great. i will try to follow what you advised. 3mins will be enough for this procedure i think. Last time we blew one of the memory chips located at the corner of the RSX chip. we didn't know that thing will blew in high temperatures and you can hear the loud sound of the explosion. Lol

will definitely avoid those chips while heating the rsx this time. Thanks for your time
If you reflow keep the heatspreader on the rsx to protect the ram chips, remove after to delid, the chart shows a 8 minutes cycle and the temperature ramp it works upto per minute and cool down, you probably won't be able to copy this in a normal oven but just to give you a rough idea.
 
If you reflow keep the heatspreader on the rsx to protect the ram chips, remove after to delid, the chart shows a 8 minutes cycle and the temperature ramp it works upto per minute and cool down, you probably won't be able to copy this in a normal oven but just to give you a rough idea.
What ? Did i hear correct? Keeping the headspreader while implementing the reflow procedure..... i think this wouldn't be a good idea all the heat will be transferred to the ram chips on corners and the die itself, which both we don't want. We gonna damage all the ram chips and maybe the rsx itsef from the die's heat. What i think is to first delid the rsx and reflow only the empty side and the 3 capacitors included sides which you can call them the corners and avoid to heat the ram chips, that should do the trick and of course first all the bga legs should be oiled with enough flux. And yeah while keeping the headspreader with the reflow procedure, not enough heat will be transferred from the thickness of the spreader and pcb in this 3 min duration procedure.
 

Similar threads

Back
Top