gamerman 5000
Developer
In this tutorial we will learn step by step how to install PSX games to load them in Open PS2 Loader (OPL) from the applications menu.
Before continuing, it is necessary to have read the following tutorial "Guide to Install APPS in Open PS2 Loader via USB" since it will be referred to later, you can read it at the following link:
https://www.psx-place.com/threads/guide-to-install-apps-in-open-ps2-loader-via-usb.41054/
What do we need?
1.-Have the POPSTARTER emulator installed.
To download it see the following thread:
https://www.psx-place.com/threads/popstarter.19139/
2.- The PSX game rom with VCD extension (the emulator only works with this file extension).
3.- With the help of the file called "CUE2POPS_2_3.EXE" included in the POPSTARTER download, we can convert our games that must be in bin and cue format to VCD format.
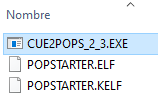
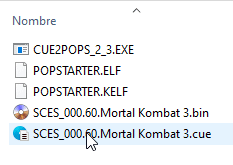
4.- We place our game in my case "SCES_000.60.Mortal Kombat 3" in bin and cue format in the folder where the file called "CUE2POPS_2_3.EXE" is located, it should look like this:

Note: If you have a game with multiple tracks (Track01.bin, Track02.bin, Track03.bin…) see the following thread "Create cue file for PSX games from multiple audio tracks and convert them into a single bin file".
https://www.psx-place.com/threads/c...nd-convert-them-into-a-single-bin-file.40931/
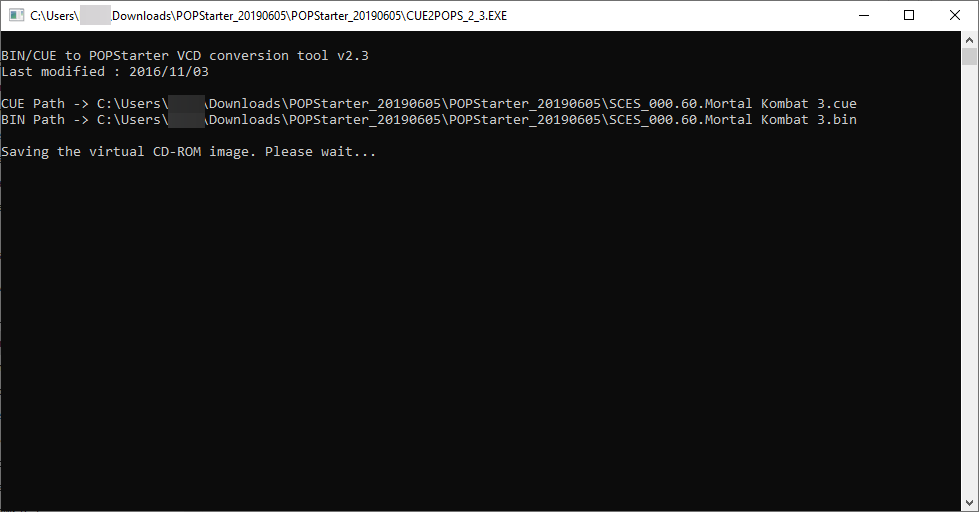
5.- We select the game file with the extension "cue" in my case "SCES_000.60.Mortal Kombat 3.cue" and drag it over the file "CUE2POPS_2_3.EXE" a command window will appear that will show the progress of the conversion, we wait for it to convert our game to a VCD image.
6.- When finished we will have our game with VCD extension.

Installing the game
7.- Having everything necessary and mentioned in steps 1 and 2, we proceed to create a folder called "POPS" in the root of our USB. Don't worry about the "memory card" folder since once the emulator starts it will create them automatically.
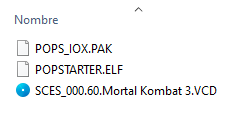
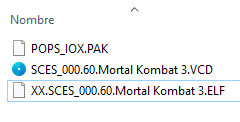
The "POPS" folder of the PSX games should contain the following files "POPS_IOX.PAK" "POPSTARTER.ELF" "game.VCD" in my case "SCES_000.60.Mortal Kombat 3.VCD", and it will look like this:
8.- In order for the emulator to load our game we must rename the file "POPSTARTER.ELF" with the name of the game respecting the following format "XX.game.ELF" where "XX" must be capitalized, in my case it would be renamed like this:
So the "POPS" folder would be as follows:
NOTE: The "POPSTARTER.ELF" file will always need to be renamed for each game you install.
9.- We create the file "conf_apps.cfg" necessary so that OPL can load our applications seen in steps 1 and 2 of the previous tutorial. In our case, the line would be as follows:
Edit: if you get the following error:
"Error, could not run the item"
modify your line as in this example, you must place the "=" symbol attached to the text string "mass":
10.- We save the file "conf_apps.cfg" in the "memory card" seen in steps 3 - 10 of the previous tutorial.
11.- We configure OPL to be able to visualize the applications seen in steps 11-14 of the previous tutorial.
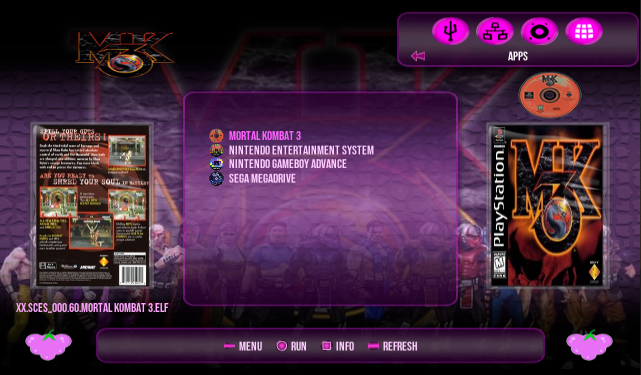
12.- We can now see our game in the OPL applications menu.
Before continuing, it is necessary to have read the following tutorial "Guide to Install APPS in Open PS2 Loader via USB" since it will be referred to later, you can read it at the following link:
https://www.psx-place.com/threads/guide-to-install-apps-in-open-ps2-loader-via-usb.41054/
What do we need?
1.-Have the POPSTARTER emulator installed.
To download it see the following thread:
https://www.psx-place.com/threads/popstarter.19139/
2.- The PSX game rom with VCD extension (the emulator only works with this file extension).
3.- With the help of the file called "CUE2POPS_2_3.EXE" included in the POPSTARTER download, we can convert our games that must be in bin and cue format to VCD format.
4.- We place our game in my case "SCES_000.60.Mortal Kombat 3" in bin and cue format in the folder where the file called "CUE2POPS_2_3.EXE" is located, it should look like this:
Note: If you have a game with multiple tracks (Track01.bin, Track02.bin, Track03.bin…) see the following thread "Create cue file for PSX games from multiple audio tracks and convert them into a single bin file".
https://www.psx-place.com/threads/c...nd-convert-them-into-a-single-bin-file.40931/
5.- We select the game file with the extension "cue" in my case "SCES_000.60.Mortal Kombat 3.cue" and drag it over the file "CUE2POPS_2_3.EXE" a command window will appear that will show the progress of the conversion, we wait for it to convert our game to a VCD image.
6.- When finished we will have our game with VCD extension.
Installing the game
7.- Having everything necessary and mentioned in steps 1 and 2, we proceed to create a folder called "POPS" in the root of our USB. Don't worry about the "memory card" folder since once the emulator starts it will create them automatically.
The "POPS" folder of the PSX games should contain the following files "POPS_IOX.PAK" "POPSTARTER.ELF" "game.VCD" in my case "SCES_000.60.Mortal Kombat 3.VCD", and it will look like this:
8.- In order for the emulator to load our game we must rename the file "POPSTARTER.ELF" with the name of the game respecting the following format "XX.game.ELF" where "XX" must be capitalized, in my case it would be renamed like this:
Code:
XX.SCES_000.60.Mortal Kombat 3.ELFSo the "POPS" folder would be as follows:
NOTE: The "POPSTARTER.ELF" file will always need to be renamed for each game you install.
9.- We create the file "conf_apps.cfg" necessary so that OPL can load our applications seen in steps 1 and 2 of the previous tutorial. In our case, the line would be as follows:
Code:
Mortal Kombat 3 = mass:/POPS/XX.SCES_000.60.Mortal Kombat 3.ELFEdit: if you get the following error:
"Error, could not run the item"
modify your line as in this example, you must place the "=" symbol attached to the text string "mass":
Code:
Mortal Kombat 3 =mass:/POPS/XX.SCES_000.60.Mortal Kombat 3.ELF10.- We save the file "conf_apps.cfg" in the "memory card" seen in steps 3 - 10 of the previous tutorial.
11.- We configure OPL to be able to visualize the applications seen in steps 11-14 of the previous tutorial.
12.- We can now see our game in the OPL applications menu.
Last edited: