BY NOW THE GUIDE NEEDS TO BE DOUBLE CHECKED.
In this guide I'll show you how to dump the NOR of the PS4 Fat, Slim and Pro. Please note that this is the first time I write a tutorial like this, if something isn't clear or I used the wrong name or there's a better solution for something, please let me know. Also I'm not a technician and it's the first time I do something similar but I'm sharing this with you as there're very few resources about this.
BEAWARE: THIS GUIDE ISN'T JAILBREAK RELATED, SO DON'T HOPE FOR A JAILBREAK OR A DOWNGRADE. I'M WRITING THIS JUST BECAUSE I NEED TO CHECK THE NOR AS I BOUGHT A BROKEN PS4 SLIM THAT GIVE ERROR SU-41283-8. ALSO, IF YOU'RE PLANNING TO TAKE A DUMP, READ THIS GUIDE MORE THAN ONCE AND THEN PROCEDE. IF YOU HAVE DOUBTS OR ELSE, ASK HERE FIRST.
The PS4 have two type of chips based on the PS4 model but both are MX25L25635FMI-10G, just different form factor. the PS4 10xx and 11xx use the 16-PIN SOP:

As you can see this NOR chip has the eight leg exposed per side.
The other PS4 use the 8-WSON chip instead:
 As you can see it has the leg underneath the chip and has a big ground pin at the center.
TOOLS NEEDED:
· Soldering station
· Soldering iron
· Flux
· Kapton tape
· 26 AWG Wire
· Teensy 2.0++ or CH341a or Raspberry Pi
· PC
· Philips and Torx screwdriver
· Tweezer
· Desoldering wick
· Isopropyl Alcohol
LOCATING THE NOR
First of all we need to disassembly the PS4, I don't cover this part as it is been covered many times and there's a lot of youtube video that will show you better how to do it. Once you your spare motherboard locate the NOR chip.


DESOLDERING THE NOR
After locating the NOR chip is time to desolder it. First of, as you noticed, you have some little SMD components near the NOR chip and you don't want to desolder them so let's tape the with the kapton tape.

Before starting to desolder the chip, apply some flux around the chip. Now for desoldering our chip we have to heat it doing very small circle just to cover the chip area (I remember you that near the chip there're SMD components that we don't want to desolder in any case). After some minutes grab a tweezer and lift up (NOT DRAG, ESPECIALLY IF YOU HAVE THE SECOND TYPE OF NOR CHIP, THAT'S BECAUSE UNDERNEATH THE CHIP YOU HAVE A BIG SOLDER POINT THAT COULD INTERFERE WITH THE TRACE ON THE MOTHERBOARD. IF YOU USED THE KAMPTON TAPE YOU ARE SAFER BECAUSE IN CASE OF DRAGGING THE SOLDER WILL JUST LAND ON THE TAPE). At this point take the isoprypol alcohol, clean the surface and after take the desoldering wick to clean all the soldering iron where there was the chip. Now that we have our chip desoldered we can procede to backup the NOR!


TAKE A NOR BACKUP WITH THE CH341a
For this guide I'll be use the CH341a programmer because I already had one and after checking the supported chip list, I found also the PS4 NOR. Before proceeding I have to point out that based on your chip model (16 PIN SOP or 8-WSON) you can use multiple adapter or solder directly on the chip.


I'll be using the clip as I have already this and I don't need to buy something else. So both chip, as you can already see on the photos at the beginning, have a little point near a pin. That point show PIN 1 on the chip. If your're using the clip, place the pin number 1 where is the red wire with the writing onto the chip facing the intern of the clip. Yes it's the same for the 16 PIN SOP.

If your're using the the other adapters, you'll find the numbering on the PCB and you can just refer to them. After placing the NOR into the clip, let's just connect to the CH341a in this way.

At this point we can use two software, one with a GUI and a terminal one wich is supported also on linux and I'll cover both.
FLASHROM (TERMINAL)
So let's download it from the files attached below and let's install the driver first. Extract the file from zip file of the flashrom package and open the Driver folder. Double click on install.cmd and we're done. Then we have two option, use the windows powershell or the prompt, both way just navigate to the folder where flashrom is. For opening a powershell in the same folder quickly, just go the folder where flashrom is then click shift + right mouse button and then click on "Open a windows powershell here" (not while the cursor is on flashrom.exe or the driver folder). At this point if you're using the powershell you give this two commands:
And if you're using the prompt you give this two commands:
So the first command is used to read the NOR chip and create a backup named PS4_1.bin and the second one is used to verify it. Then take at least other 2 backups changing the name (for example PS4_2.bin and PS4_3.bin) with the same two commands. If you're getting an error on the verifying part, let's check the clip or the adapter.
 ASPROGRAMMER (GUI)
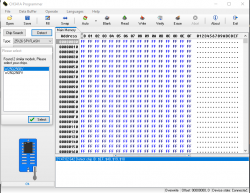
So let's download it from github (https://github.com/nofeletru/UsbAsp-flash/releases) and let's install the driver first. They're in the "CH341-Drivers" folder. Once done, open the "AsProgrammer.exe" file. On the top left click on "IC -> Search" and type "MX25L25635E" (it's not a typo).

 At this point click the chip with read arrow (the one on the right of the floppy disk) and let's wait for it to dump it, on the bottom you'll see a progress bar.

 After that, click che cip with a green equal sign and verify you're reading, on the bottom you'll see a progress bar.

 If you don't see any error, let's take at least other two dump in the same way and name them in a different way. If you're getting an error on the verifying part, let's check the clip or the adapter.

VERIFY THE DUMP
At this point we will be using two software, one HxD(https://mh-nexus.de/en/downloads.php?product=HxD20) and the BwE NOR Validator (https://www.betterwayelectronics.com.au/#Downloads).
HXD
Now that we have our dump, let's see if they're good. At first we'll be use HxD. Open this program and click "CTRL+K" and click on both the three dots (once per time) and select two different dumps. If it says that they're identical, just change one of them with the third one; if also this time it says that are identical then you're good to go.
BWE NOR VALIDATOR
Place a copy of one of the NOR backup in the same folder of the BwE NOR Validator and start it by double clicking. At this point click start and it will appear a terminal and it will be check for new update. Once completing the checking, it will ask you what dump to check and you have to type the corresponding number and press "Enter". Then click 6 and it will perform a full check, once finished it will open a browser windows with the result (the file will be saved in the same director of the validator).
In this guide I'll show you how to dump the NOR of the PS4 Fat, Slim and Pro. Please note that this is the first time I write a tutorial like this, if something isn't clear or I used the wrong name or there's a better solution for something, please let me know. Also I'm not a technician and it's the first time I do something similar but I'm sharing this with you as there're very few resources about this.
BEAWARE: THIS GUIDE ISN'T JAILBREAK RELATED, SO DON'T HOPE FOR A JAILBREAK OR A DOWNGRADE. I'M WRITING THIS JUST BECAUSE I NEED TO CHECK THE NOR AS I BOUGHT A BROKEN PS4 SLIM THAT GIVE ERROR SU-41283-8. ALSO, IF YOU'RE PLANNING TO TAKE A DUMP, READ THIS GUIDE MORE THAN ONCE AND THEN PROCEDE. IF YOU HAVE DOUBTS OR ELSE, ASK HERE FIRST.
The PS4 have two type of chips based on the PS4 model but both are MX25L25635FMI-10G, just different form factor. the PS4 10xx and 11xx use the 16-PIN SOP:
As you can see this NOR chip has the eight leg exposed per side.
The other PS4 use the 8-WSON chip instead:
TOOLS NEEDED:
· Soldering station
· Soldering iron
· Flux
· Kapton tape
· 26 AWG Wire
· Teensy 2.0++ or CH341a or Raspberry Pi
· PC
· Philips and Torx screwdriver
· Tweezer
· Desoldering wick
· Isopropyl Alcohol
LOCATING THE NOR
First of all we need to disassembly the PS4, I don't cover this part as it is been covered many times and there's a lot of youtube video that will show you better how to do it. Once you your spare motherboard locate the NOR chip.
DESOLDERING THE NOR
After locating the NOR chip is time to desolder it. First of, as you noticed, you have some little SMD components near the NOR chip and you don't want to desolder them so let's tape the with the kapton tape.
Before starting to desolder the chip, apply some flux around the chip. Now for desoldering our chip we have to heat it doing very small circle just to cover the chip area (I remember you that near the chip there're SMD components that we don't want to desolder in any case). After some minutes grab a tweezer and lift up (NOT DRAG, ESPECIALLY IF YOU HAVE THE SECOND TYPE OF NOR CHIP, THAT'S BECAUSE UNDERNEATH THE CHIP YOU HAVE A BIG SOLDER POINT THAT COULD INTERFERE WITH THE TRACE ON THE MOTHERBOARD. IF YOU USED THE KAMPTON TAPE YOU ARE SAFER BECAUSE IN CASE OF DRAGGING THE SOLDER WILL JUST LAND ON THE TAPE). At this point take the isoprypol alcohol, clean the surface and after take the desoldering wick to clean all the soldering iron where there was the chip. Now that we have our chip desoldered we can procede to backup the NOR!
TAKE A NOR BACKUP WITH THE CH341a
For this guide I'll be use the CH341a programmer because I already had one and after checking the supported chip list, I found also the PS4 NOR. Before proceeding I have to point out that based on your chip model (16 PIN SOP or 8-WSON) you can use multiple adapter or solder directly on the chip.
I'll be using the clip as I have already this and I don't need to buy something else. So both chip, as you can already see on the photos at the beginning, have a little point near a pin. That point show PIN 1 on the chip. If your're using the clip, place the pin number 1 where is the red wire with the writing onto the chip facing the intern of the clip. Yes it's the same for the 16 PIN SOP.
If your're using the the other adapters, you'll find the numbering on the PCB and you can just refer to them. After placing the NOR into the clip, let's just connect to the CH341a in this way.
At this point we can use two software, one with a GUI and a terminal one wich is supported also on linux and I'll cover both.
FLASHROM (TERMINAL)
So let's download it from the files attached below and let's install the driver first. Extract the file from zip file of the flashrom package and open the Driver folder. Double click on install.cmd and we're done. Then we have two option, use the windows powershell or the prompt, both way just navigate to the folder where flashrom is. For opening a powershell in the same folder quickly, just go the folder where flashrom is then click shift + right mouse button and then click on "Open a windows powershell here" (not while the cursor is on flashrom.exe or the driver folder). At this point if you're using the powershell you give this two commands:
.\flashrom --programmer ch341a_spi -r PS4_1.bin
.\flashrom --programmer ch341a_spi -v PS4_1.bin
.\flashrom --programmer ch341a_spi -v PS4_1.bin
flashrom --programmer ch341a_spi -r PS4_1.bin
flashrom --programmer ch341a_spi -v PS4_1.bin
flashrom --programmer ch341a_spi -v PS4_1.bin
So let's download it from github (https://github.com/nofeletru/UsbAsp-flash/releases) and let's install the driver first. They're in the "CH341-Drivers" folder. Once done, open the "AsProgrammer.exe" file. On the top left click on "IC -> Search" and type "MX25L25635E" (it's not a typo).
VERIFY THE DUMP
At this point we will be using two software, one HxD(https://mh-nexus.de/en/downloads.php?product=HxD20) and the BwE NOR Validator (https://www.betterwayelectronics.com.au/#Downloads).
HXD
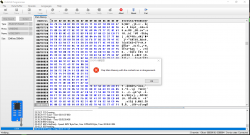
Now that we have our dump, let's see if they're good. At first we'll be use HxD. Open this program and click "CTRL+K" and click on both the three dots (once per time) and select two different dumps. If it says that they're identical, just change one of them with the third one; if also this time it says that are identical then you're good to go.
Just opened the programm you'll see this:

Press CTRL+K

Choose two differnt files

They're identical

Choose two differnt files
They're identical
BWE NOR VALIDATOR
Place a copy of one of the NOR backup in the same folder of the BwE NOR Validator and start it by double clicking. At this point click start and it will appear a terminal and it will be check for new update. Once completing the checking, it will ask you what dump to check and you have to type the corresponding number and press "Enter". Then click 6 and it will perform a full check, once finished it will open a browser windows with the result (the file will be saved in the same director of the validator).
Once opened click start

Choose the dump to analyze

Choose 6 for full statistics
Wait untill it's done

Choose the dump to analyze
Choose 6 for full statistics
Wait untill it's done
Attachments
Last edited: