PS3 CECHA PS3 YLOD Saga

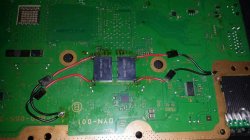
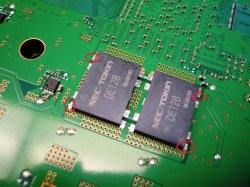
So ive tested my 60Gb again, and as surprised it YLOD but still turns on, but this time the funny thing its that it only holds up when warm, that might point out the issues to the NEC/Tokin, which have a habit of working when warm.

I only learned that years ago, when my Toshiba laptop started random shutdown, and work only when warmed with a hair dryer (DYI FTW) :D

Sent from my F8331 using Tapatalk

So it looks like an aging capacitor about to meet it's end...
Good thing we are getting to the bottom of it :D
Thanks for Fanhais for being the first to bring the NEC TOKIN up.

I've never had issues with Tekken Tag Tournament 2 on my CECHB01. It's NTSC-J though so i'm not sure if they fixed the issue or if it's non-existant on that particular version. Typically, i'll have two hour gaming sessions on there so I can't comment on extended playtime.

I am running webMAN-MOD with the dynamic fan option which can make the console sound like a commercial jet taking off at certain points on other games.

It usually happens 5-30 minutes into the gameplay.
It might happen in a different game,it happens to me with Gran Turismo 5 and 6.
 
Did you solder directly to the NEC/TOKINs or did you remove them, can you show me a schematic and Tantalum spec you used, my 60Gb shows really unstable use, even as far as turning every 15 min off with stable 50ºs around both chips, i suspect the NEC are fryied :)
If your NEC TOKIN is totally fried then you should replace it.
If the NEC TOKIN is still alive you can solder a Tantalum in parallel.
 
If your NEC TOKIN is totally fried then you should replace it.
If the NEC TOKIN is still alive you can solder a Tantalum in parallel.
Well good thing its the NECs even these kids beat the crap out of this 60Gb.

I have to start it like 6/15 times just to get it to XMB, and even so, shutodown its imminent, tested with 2 PS2 games, GT4 and NFSU2, so thats shorts the probability to be the GPU, so the NECs are 50/50% working, now i dont know if i solder them in parallel or remove them, as soldering isnt my high regarding skill :P
A dying GPU will most likely display artifacts under heavy load,The last of Us,Red dead redemption and Beyond:Two Souls are good for stressing the whole console.
 
A dying GPU will most likely display artifacts under heavy load,The last of Us,Red dead redemption and Beyond:Two Souls are good for stressing the whole console.
Yeah i know that mate, thanks for the heads up, even on the XMB a failing GPU its enough for showing artifacts, my unit isnt showing anything, so its all good, except for the NECs :D
 
I've never had issues with Tekken Tag Tournament 2 on my CECHB01. It's NTSC-J though so i'm not sure if they fixed the issue or if it's non-existant on that particular version. Typically, i'll have two hour gaming sessions on there so I can't comment on extended playtime.

I am running webMAN-MOD with the dynamic fan option which can make the console sound like a commercial jet taking off at certain points on other games.
Ah, thats the Japanese 20gb? These things came out exactly when my CECHA did, so i dont see why there should be an issue of the boards causing the shutdown. Leaning towards a failed component. Thanks for weighing in.
 
Hang on here.. from what I am reading regarding Naked Snakes' problem here is that the faulty Nec Tokins cause way more erratic behaviour in shutdowns, typically when the unit is still cold. My unit can already be at optimum temp and the unit still shuts down. Always in an actual match and never anywhere else. It must be something to do with resources needed to power the game play that it fails on.

Is there a COD 2 or Uncharted demo on the PSN store or something? I'd really like to test these games out and see if i get the classic shutdown, or whether its literally just TAG2 causing this.
 
direct solder on Nec in parallel but you need to do some ground or link an wire on negative point of capacitor and solder some zone was ground on the board i show you this picture from internet to try explain what i did
 

Attachments

  • IMG-20151115-WA0001.jpg.4e7317cf2f555de3440f9e70007bc9dc.jpg
    IMG-20151115-WA0001.jpg.4e7317cf2f555de3440f9e70007bc9dc.jpg
    106.7 KB · Views: 1,051
Hang on here.. from what I am reading regarding Naked Snakes' problem here is that the faulty Nec Tokins cause way more erratic behaviour in shutdowns, typically when the unit is still cold. My unit can already be at optimum temp and the unit still shuts down. Always in an actual match and never anywhere else. It must be something to do with resources needed to power the game play that it fails on.

Is there a COD 2 or Uncharted demo on the PSN store or something? I'd really like to test these games out and see if i get the classic shutdown, or whether its literally just TAG2 causing this.
NEC TOKINs can shutdown even when the temperature of the machine its at a hot state, it happend me before on the old TOSHIBA laptop (most common brand with these problems), the 1st time it only worked when at a warm operational state, after some months of use, it would shutdown, even at the extra hot operation temperature, which its what i suspect happend to this 60Gb, and the kids who i got it from tortured it with COD in blazing summer, and let me share a little secret with your lads, summer in Portugal its like living under a grill, its blazing hot :D
 
direct solder on Nec in parallel but you need to do some ground or link an wire on negative point of capacitor and solder some zone was ground on the board i show you this picture from internet to try explain what i did
Ahhh i see you soldered them with jumpers, a little easier, but ive seen lads soldering them side by side with the NECs including the Grounding points on the MOBO, which its on the middle of the NECs
 
TRY this way and solder 4 tantalus on gpu side from the top of motherboard and test if works fine if not well put in cell side but should work with for on rsx side, you have two NECs on top and you will put 4 Tantalus in parallel like image from the picture
 
TRY this way and solder 4 tantalus on gpu side from the top of motherboard and test if works fine if not well put in cell side but should work with for on rsx side, you have two NECs on top and you will put 4 Tantalus in parallel like image from the picture
Thanks mate, ill try with the bypass wire like you did,only a shorter lenght, not to do a mess, or solder directly to the NECs and GRD points on the RSX and CELL (just for precautions),still have to order a few, what Tantalum specs you used btw!?
 
i use 470 uf but i think for 330 uf can do the job,
solder on this marks the pole positive on the board

and the tantalum the marks are red Positive and blue negative/ground
 

Attachments

  • 41983.jpg
    41983.jpg
    221.3 KB · Views: 1,162
  • s-l300.jpg
    s-l300.jpg
    29 KB · Views: 361
Last edited:
i use 470 uf but i think for 330 uf can do the job,
solder on this marks the pole positive on the board

and the tantalum the marks are red Positive and blue negative/ground

Just to make sure,Can i use what i marked in red as ground?
They aren't connected to any trace or component as far as i look at it :D
COK-002_-_1-873-513-31.png
 
Just to make sure,Can i use what i marked in red as ground?
They aren't connected to any trace or component as far as i look at it :D
View attachment 13800
Nop, the grounds are the solders at the center of the tokins, look at the datasheet i posted to see how are the solder (lines) under the tokins

Btw snake take a look at the link i posted from a brazilian forum, they have a good gallery of images you can see how other people did it
Also, i have not tryed to translate it but there are some talks about all this
 
Nop, the grounds are the solders at the center of the tokins, look at the datasheet i posted to see how are the solder (lines) under the tokins


Btw snake take a look at the link i posted from a brazilian forum, they have a good gallery of images you can see how other people did it
Also, i have not tryed to translate it but there are some talks about all this
Don't worry mate, i understand perfect Portuguese, so Brazilian Portuguese isn't an issue, thanks for the schematics :D

Sent from my F8331 using Tapatalk
 
Don't worry mate, i understand perfect Portuguese, so Brazilian Portuguese isn't an issue, thanks for the schematics :D

Sent from my F8331 using Tapatalk
Before starting soldering post here what you are planning to do, everytime i see one of that photos it cames to mind some ideas to simplify it a bit more XD

Im not going to mention every small idea i had when looking at the photos, because there are different ways to do it and could be confusing, but there is something i imagined that is worthy to be mentioned because is the easyest way by far

Lets use this photo as example...
cok-002_-_1-873-513-31-png.13800

Note every tokin have 8 solder points around (that belongs to 4 lines that crosses the tokin side by side)

The idea is to buy a replacement tokin exactly like the original... then place it on top of the original (damaged) tokin... but displaced 2 or 3 milimeters to a side

And in that position... use the solder iron to create 4 "columns" of tin... from the new tokin to the motherboard
No wires, no need to scratch or shit... are just 4 solders balls (well, actually not "balls" but "columns")

If i remember right this technique is named "piggy backing"... consists in placing a component on top of another one and soldering both together
It should work unless the damaged tokin is in shorcut (if is in shorcut you need to remove it, of course, but removing it is a pita)... but if the damaged tokin is in shorcut the PS3 should not boot at all... so this is not the case
 
Last edited:
Note every tokin have 8 solder points around (that belongs to 4 lines that crosses the tokin side by side)

The idea is to buy a replacement tokin exactly like the original... then place it on top of the original (damaged) tokin... but displaced 2 or 3 milimeters to a side

And in that position... use the solder iron to create 4 "columns" of tin... from the new tokin to the motherboard
I made a drawing to show you the idea, because a picture worths hundred words :)

Before:
335971.jpg

After:
S2oEdY4.jpg
 
Last edited:
How about puting a capacitor on every red+blue?:
View attachment 13801

Will it work?
Yes, it should work, thats the basic but can be simplifyed a lot

The first thing you need to keep in mind at all times is the grounds are common, so you can use a single wire for all the circles you painted in blue
So 8 wires + 1 = 9 solders to the motherboard in total

But it can be simplifyed even more... this is hard to explain and to understand it well is needed to take a look at how every tokin is connected "together" with other tokin at his side "in pairs", so are in paralell in groups of 2
This means... from the point of view of electrical connections we can consider every pair of tokins as a single component
It becomes a bit more confusing because the fact every tokin contains 2 capacitors... so every "pair" of tokins are 4 capacitors connected together, lol

I guess i need to make another drawing to explain this :D
 
Back
Top