pinkfloydviste
Moderator
I've downgraded 100+ consoles over the last couple of years using the soldering/e3 linker method (as opposed to the nor clip). Last night I downgraded [MENTION=6]bitsbubba[/MENTION]'s ps3 and took a few pictures because I'm a nerd a thought some of my fellow nerds might find this interesting or even useful. Anyways, I'm not going into great detail about each step of the downgrade process as there are plenty of great guides prepared by people with a lot more technical knowledge than me. However, this could help someone get setup for downgrading via the e3 linker if they so choose.
Below is the first e3 linker I set up (minus a few of the wires). My soldering skills have greatly improved since I prepared this first clip, but you get the idea. BTW, I get all these wires from spare Ethernet and HDMI cables.

This one is the actual E3 flasher/clip combo I use for my downgrades. As you can see, I reinforced it with a bunch of electrical tape to make sure none of the wires can be pulled out and the connection between the E3 linker and flasher won't be damaged.

This one shows how long my wires are. The first clip I prepared, I made the mistake of making the wires half the length as these and it was a bit of a pain. You can also see that I (actually my wife helped me out with that) labeled each individual wire so I can easily know where to solder it on the ps3 motherboard.

This is [MENTION=6]bitsbubba[/MENTION]'s motherboard before soldering all the wires.

This is the diagram I have hanging on the wall by my workbench to tell me where each wire goes.

This is [MENTION=6]bitsbubba[/MENTION]'s ps3 with each wire soldered into place

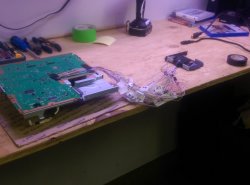
This is the console put partially back together to dump the nor flash and then re-flash it back after verifying and patching it.

This is my 1st Gen IPod Touch that I jailbroke and turned into a PS3 Factory Service Mode Jig.

Same as the last, at this stage I've already verified the dump, patched it, and flashed it back to the PS3. Now the FSM Jig is plugged in and ready. Now I just hit power/eject on the console to send the PS3 to factory service mode and then perform the actual downgrade

Everything went smoothly with this downgrade and now [MENTION=6]bitsbubba[/MENTION] has a PS3 that is ready to be unlocked and used to it's full potential.
Below is the first e3 linker I set up (minus a few of the wires). My soldering skills have greatly improved since I prepared this first clip, but you get the idea. BTW, I get all these wires from spare Ethernet and HDMI cables.
This one is the actual E3 flasher/clip combo I use for my downgrades. As you can see, I reinforced it with a bunch of electrical tape to make sure none of the wires can be pulled out and the connection between the E3 linker and flasher won't be damaged.
Everything went smoothly with this downgrade and now [MENTION=6]bitsbubba[/MENTION] has a PS3 that is ready to be unlocked and used to it's full potential.
")

