PS3 How to Enable Hidden Blue/Red Light in PS3 SLIM

You little thief.... I have 2 CECH2003A's and was wondering here one of them had gone? give it back.....:-p:D :rolling:

No stealing my idea for the PS3 logo.....:-p its copyrighted and patented....:-p:D
Yeah, I went all the way to the UK just to steal your PS3 :rolling:
I thought ill come up with my own design, always wanted RGB on my PS3, PS2 and X360.
This might be the start of that :D:-p:rolleyes:
 
Yeah, I went all the way to the UK just to steal your PS3 :rolling:
I thought ill come up with my own design, always wanted RGB on my PS3, PS2 and X360.
This might be the start of that :D:-p:rolleyes:

I thought so.... only joking :D

LED's do give the consoles a bit more uniqueness to them and customisation. Am not bothered if some used the idea as I am guna make a tut on it for people when its all done.

I was also thinking about LEDs shining through the BD drive and air vents (For if the PS3 was flat) and USB ports. As well as getting a company to carve out REBUG under the PS3 logo so I can put permanent red LEDs there. Going to need a spare shell for that in case they screw it up or I screw up cutting out the PS3 logo.
 
2104A, with HSW-001 Switchboard.

Sent from my G8341 using Tapatalk
86fd633287418d73ede19f4739dc649e.jpg
 
2104A, with HSW-001 Switchboard.

Sent from my G8341 using Tapatalk
86fd633287418d73ede19f4739dc649e.jpg

Stop rubbing it in me face....:-p

Looks good, but i want it so its red when its on standby, just asked about for a thin tipped soldering iron as the one i have is not for this kind of work lol. It'd too big lol. Also a way to fill the light bar maybe as well. Its guna have LED's all over when am done lol... but i a good way and not over the top making it look like a expensive table lamp.

Just need to make sure i get the wiring right for my model PS3
 
@Cypher_CG89
I thought of a line of blue where your taking of the top part of the shell, like in the crack between the bottom part of the shell and the top part. :-p:D
I am not good enough at English to explain, I hope you understand what I mean anyway. ;)
 
@Cypher_CG89
I thought of a line of blue where your taking of the top part of the shell, like in the crack between the bottom part of the shell and the top part. :-p:D
I am not good enough at English to explain, I hope you understand what I mean anyway. ;)

I know exactly what you mean...... i think. basically a blue line in between where the bottom and top parts of the shell meet. So if the PS3 has horizontal (lying flat) it would look like a ring of blue around the center of the shell of the PS3? Am I close?
 
I know exactly what you mean...... i think. basically a blue line in between where the bottom and top parts of the shell meet. So if the PS3 has horizontal (lying flat) it would look like a ring of blue around the center of the shell of the PS3? Am I close?
Exactly :encouragement:
 
Yeah, I went all the way to the UK just to steal your PS3 :rolling:
I thought ill come up with my own design, always wanted RGB on my PS3, PS2 and X360.
This might be the start of that :D:-p:rolleyes:
The good thing of this mod is that is not much risky... the switch boards are cheap, and actually this "misterious" leds are located at a side of the board and there are no other circuits near them

Actually... you can take the boards HSW-001 and DSW-001 and "break" them with your hands at the left of the connector and they will keep working normally like from factory (dont do it thought, but yeah, they was losing money for building them like that)

The risky part is when you connect the switch board to the main motherboard (incase have some shorcut)
But before that there is no risk, you are soldering in a board that costs 10€ as much

2104A, with HSW-001 Switchboard.

Sent from my G8341 using Tapatalk
86fd633287418d73ede19f4739dc649e.jpg
Exactly like mine :D
I guess you removed the red led, right ?

I thought so.... only joking :D

LED's do give the consoles a bit more uniqueness to them and customisation. Am not bothered if some used the idea as I am guna make a tut on it for people when its all done.

I was also thinking about LEDs shining through the BD drive and air vents (For if the PS3 was flat) and USB ports. As well as getting a company to carve out REBUG under the PS3 logo so I can put permanent red LEDs there. Going to need a spare shell for that in case they screw it up or I screw up cutting out the PS3 logo.
I mentioned the epoxy resin (to build plastic parts) because the cutting/drilling you want to do in the PS3 logo
The drilling is not specially hard, is just it needs lot of patience and it needs to be made very carefully to dont make any "mark" in the verticall walls

And after that is when you could make some test with the resin... what i was thinking is to drop lot of silicone in a bowl... then grab the top case shell (with the drilled PS3 hole) flip it and "push" it into the silicone... and let it dry for 2 or 3 days

Not sure if it will be precise enought... but by doing that you have the "inverse" mold of the logo... after that you need to make another "inverse" mold of silicone
And finally... drop the epoxy resine in the mold

The good thing is you dont need to spend money in it because you have the epoxy resine already... also the resine i mentioned is a bit special (and expensive) because is "crystal clear" (completly transparent like glass)
But is not really needed to be completly transparent... the only requirement is it needs to be a bit "translucid"... but if the resine have some color tone (like green, or anything except brown) it will be fine
Also, you can sandpaper the resine "PS3" piece a bit to make it a bit rought and reduce the transparency
 
Last edited:
I know exactly what you mean...... i think. basically a blue line in between where the bottom and top parts of the shell meet. So if the PS3 has horizontal (lying flat) it would look like a ring of blue around the center of the shell of the PS3? Am I close?
Initially is not going to work well, because the top and bottom shells does a very well contact in between them (are like sealed), so the light inside the shell cant go out

Actually, i always thought the "pop" and "clack" noises that eventually does all PS3's comes from that assembly in between top and bottom plastic shells
What happens is the plastics expands and contracts with the temperature changes, and this is when it does the (weird and annoying) sounds

But im thinking in something to create a "gap" in between top and bottom shells... you could try to add 2 or 3 plastic "washers" in every one of the long screws that closes the shells
You know... the 6 long screws that can be seen when you look at the bottom of a PS3 slim


-----------
Btw, if some of you make a (very good quality and huge size) photos of both sides of the DSW-001 board i can make some drawings to show you how that circuit works
I know this boards from memory because the amount of time i spent looking at the HSW-001 so im sure im able to describe the whole circuit of DSW-001 just by looking at the photos :)
 
Last edited:
The good thing of this mod is that is not much risky... the switch boards are cheap, and actually this "misterious" leds are located at a side of the board and there are no other circuits near them

Actually... you can take the boards HSW-001 and DSW-001 and "break" them with your hands at the left of the connector and they will keep working normally like from factory (dont do it thought, but yeah, they was losing money for building them like that)

The risky part is when you connect the switch board to the main motherboard (incase have some shorcut)
But before that there is no risk, you are soldering in a board that costs 10€ as much


Exactly like mine :D
I guess you removed the red led, right ?


I mentioned the epoxy resin (to build plastic parts) because the cutting/drilling you want to do in the PS3 logo
The drilling is not specially hard, is just it needs lot of patience and it needs to be made very carefully to dont make any "mark" in the verticall walls

And after that is when you could make some test with the resin... what i was thinking is to drop lot of silicone in a bowl... then grab the top case shell (with the drilled PS3 hole) flip it and "push" it into the silicone... and let it dry for 2 or 3 days

Not sure if it will be precise enought... but by doing that you have the "inverse" mold of the logo... after that you need to make another "inverse" mold of silicone
And finally... drop the epoxy resine in the mold

The good thing is you dont need to spend money in it because you have the epoxy resine already... also the resine i mentioned is a bit special (and expensive) because is "crystal clear" (completly transparent like glass)
But is not really needed to be completly transparent... the only requirement is it needs to be a bit "translucid"... but if the resine have some color tone (like green, or anything except brown) it will be fine
Also, you can sandpaper the resine "PS3" piece a bit to make it a bit rought and reduce the transparency
Nope, i didnt remove it, but in order to work on this board, you need to bridge either the RED or Blue LED with a current point, then bridge both RED and Blue, to share the same current,or else it wont work, but the RED LED was burned anyways, stupid me heated the iron too much :D
 
Initially is not going to work well, because the top and bottom shells does a very well contact in between them (are like sealed), so the light inside the shell cant go out

I just had a very good idea on what @ISAK.M wanted to achieve, and i see one problem with this, raise in the top part of the shell and you also alter the height and which the BD Disc's go in the drive. The drive itself would remain at the same height but the entry slot in the shell would be raised, raise it too much and the disc's will get scratched to hell as on the plastic shell as the drive ejects the disc.

BUT it should be perfectly possible to raise it just enough to get a gap to give a good effect with the LEDs. Plus as he wants an all round effect there's a simple way to get the LEDs > Use 5v LED strip lights, they are used for all sorts, I have some on the back of my TV's, that's what is shining down in the pic's I put up of one of my PS3's. All the LEDs are there plus the circuits, they would just need powering and grounding > solder to a 5v rail and ground point. Plus create some mount point in side the case to keep them away from the shell edge and the effect would be very good. If you can mange to get the remote sensor to be at the back of the console out side the case (out of sight) then they would also be custom colours instead of just one colour.

What happens is the plastics expands and contracts with the temperature changes, and this is when it does the (weird and annoying) sounds

Yep, exactly. Everything expands and's and contracts with heat and cool, depending on the material depends how heat and how much it expands. I know we had a very good discussion on this kind of thing on the PS3's shell possible manufacturing methods.

The problem I noticed with what I wanted to do when I quickly took the top half of the shell off yesterday for a quick look at the switch board and the shell was that there are 2 supporting spine running through the PS3 that go from one side of the shell to the other, at first my initial thought was "FFS" lol.. then I realised that these are a perfect depth the glue a clear sheet to and create a "light box" of the logo adding more depth to it and giving a very good effect.

Btw, if some of you make a (very good quality and huge size) photos of both sides of the DSW-001 board i can make some drawings to show you how that circuit works
I know this boards from memory because the amount of time i spent looking at the HSW-001 so im sure im able to describe the whole circuit of DSW-001 just by looking at the photos :)

How big? my phone takes pics at 720p... which is about 3000+ pixels across per photo image size, the problem being they are 7.7mb in size, I will find a way to decrease the file size as am sure the sites size limit for uploads is 7mb?? If iirc what STL was telling me. I will take a pic of my DSW-001 board sometime today. The pics i put up before I had to alter before posting them lol.
 
Is this only for the 2000? Not the 3000?

2000, 2100 & 2500 for the hidden LED light that are already there on the switchboard. But you can always do your own by using the MB's 5v rails and grounding points and using the right resistor in the wiring to the LEDs and putting them in the right places. Or go full custom lighting in the PS3 as I am thinking.
 
2000, 2100 & 2500 for the hidden LED light that are already there on the switchboard. But you can always do your own by using the MB's 5v rails and grounding points and using the right resistor in the wiring to the LEDs and putting them in the right places. Or go full custom lighting in the PS3 as I am thinking.
Ah,i have a 3000.Oh well then.
 
I just had a very good idea on what @ISAK.M wanted to achieve, and i see one problem with this, raise in the top part of the shell and you also alter the height and which the BD Disc's go in the drive. The drive itself would remain at the same height but the entry slot in the shell would be raised, raise it too much and the disc's will get scratched to hell as on the plastic shell as the drive ejects the disc.
You are not going to believe it now, but after writing my last post i took a look at the PS3 and realized about the disalignment of the bluray drive slot, heheh
You are right, if the top shell is going to be raised (not much just 1 or 2 milimeters) then the bluray drive needs to be raised in the same amount too, right now i dont remember well how is the bluray at bottom (i never took a look at that with interest) so i cant imagine how is the best way to do it, but it should not be much hard

BUT it should be perfectly possible to raise it just enough to get a gap to give a good effect with the LEDs. Plus as he wants an all round effect there's a simple way to get the LEDs > Use 5v LED strip lights, they are used for all sorts, I have some on the back of my TV's, that's what is shining down in the pic's I put up of one of my PS3's. All the LEDs are there plus the circuits, they would just need powering and grounding > solder to a 5v rail and ground point. Plus create some mount point in side the case to keep them away from the shell edge and the effect would be very good. If you can mange to get the remote sensor to be at the back of the console out side the case (out of sight) then they would also be custom colours instead of just one colour.
Another thing i thought is the PS3 slims has squared "air vents" all along the sides (aiming to down), this is an alternative way to do it more simple, it will not be a "ring of light all around" like you was mentioning thought

Yep, exactly. Everything expands and's and contracts with heat and cool, depending on the material depends how heat and how much it expands. I know we had a very good discussion on this kind of thing on the PS3's shell possible manufacturing methods.

I hate that "popcorn" noises, lol, it happens at the first hour after turning ON the PS3 (because the plastics are expanding), and in the first half an hour after you turn OFF the PS3 (are contracting)

I removed the 6 screws at bottom (that holds the top shell in position thight) and was playing without the screws for lot of time (months), and the noises was reduced a lot
After that i thought in lubing the edges of the shells with a bit of "vaseline paste" (you can buy in a drugstore btw, moms uses to buy it for babies, no homo), this would allow the shells to "slide" with each other and i think the "popcorn" noises should be reduced to zero
I never did it because i thought the vaseline could cummulate lot of dust internally, is needed to cleanup the excess well to avoid that... but anyway i still like the idea and eventually i will do it

The problem I noticed with what I wanted to do when I quickly took the top half of the shell off yesterday for a quick look at the switch board and the shell was that there are 2 supporting spine running through the PS3 that go from one side of the shell to the other, at first my initial thought was "FFS" lol.. then I realised that these are a perfect depth the glue a clear sheet to and create a "light box" of the logo adding more depth to it and giving a very good effect.
Good word "spine", sometimes i dont know which word to use in english, but that one is perfect :)
If you stay in front of a PS3 slim with the PS3 in horizontal position
The big spine goes from front to back, it has 2 purposes, is structural because makes the top shell more robust (incase you place a weight on top of the PS3), and also it "pushes" the bluray drive to bottom, note the bluray drive have a line of "foam tape" on top that matches exactly with the spine
There are another 2 spines horizontally of smaller height, this ones doesnt touches any other part, are just structural

I removed them with a razor knife to improve the airflow inside the top of the shell :D
The point is that "work" cutting plastic looks bad, but is inside the shell so it doesnt matters how good or bad it looks because it cant be seen from outside

But for your mod can come in handy, you can drill holes in them and use screws+bolts to attach a sheet of aluminium to make a frame all around the PS3 logo... and use that frame to mount the custom parts... either leds, or a piece of resine like i mentioned, or methacrylate, whatever

Btw, i been thinking in what i said initially of using a very transparent plastic like glass... and is not a good idea
Imagine you place a led behind a glass and look at it... you are going to see the led perfectly with lot of intensity and it will be annoying
What you need is to use some material that "difuses" the light (or softness)... it can be made by sandpapering it... or you can use a semitransparent sticker (sticked at the inner of the shell)

How big? my phone takes pics at 720p... which is about 3000+ pixels across per photo image size, the problem being they are 7.7mb in size, I will find a way to decrease the file size as am sure the sites size limit for uploads is 7mb?? If iirc what STL was telling me. I will take a pic of my DSW-001 board sometime today. The pics i put up before I had to alter before posting them lol.
Take them at max quality, and dont resample or resize them please, is better if you compress them inside a .zip and upload to an external hosting like mega, sendspace, etc...

Probably i will not resample them either to preserve max quality, the biggest is the better because the people are going to zoom them to huge values to see the small details

Look at this image, i made it by joining two photos i found somewhere (and i was lucky that overall both photos was matching)
https://www.psdevwiki.com/ps3/File:Power_Eject_board_HSW-001_(PCB_top_view).jpg

Btw, try to take the photos from a perfect vertical to avoid perspective deformations, this way maybe i can overlap/flip/mirror one side on top of the other side to see the whole circuit in a single side, like i did with this
http://www.psx-place.com/threads/teensy2ps3-pcb-linker-teensy-2-0-ps3.1728/page-3#post-158300

Initially i dont want to do it, but just incase, im not sure, maybe i will need to do it to understand the circuit

2000, 2100 & 2500 for the hidden LED light that are already there on the switchboard. But you can always do your own by using the MB's 5v rails and grounding points and using the right resistor in the wiring to the LEDs and putting them in the right places. Or go full custom lighting in the PS3 as I am thinking.
Thats the spirit, heheh
Some of the things we are talking about can be made in other PS3 models, actually from the videos luanteles posted the most complicated mod is the one that deals with 2 lighting modes and 2 colors... but that one is made by connecting the wires to the dual led (red + green originally) located in the power ON/OFF button
All PS3 models have that 2 leds... are needed to show the YLOD so even PS3 superslims have them

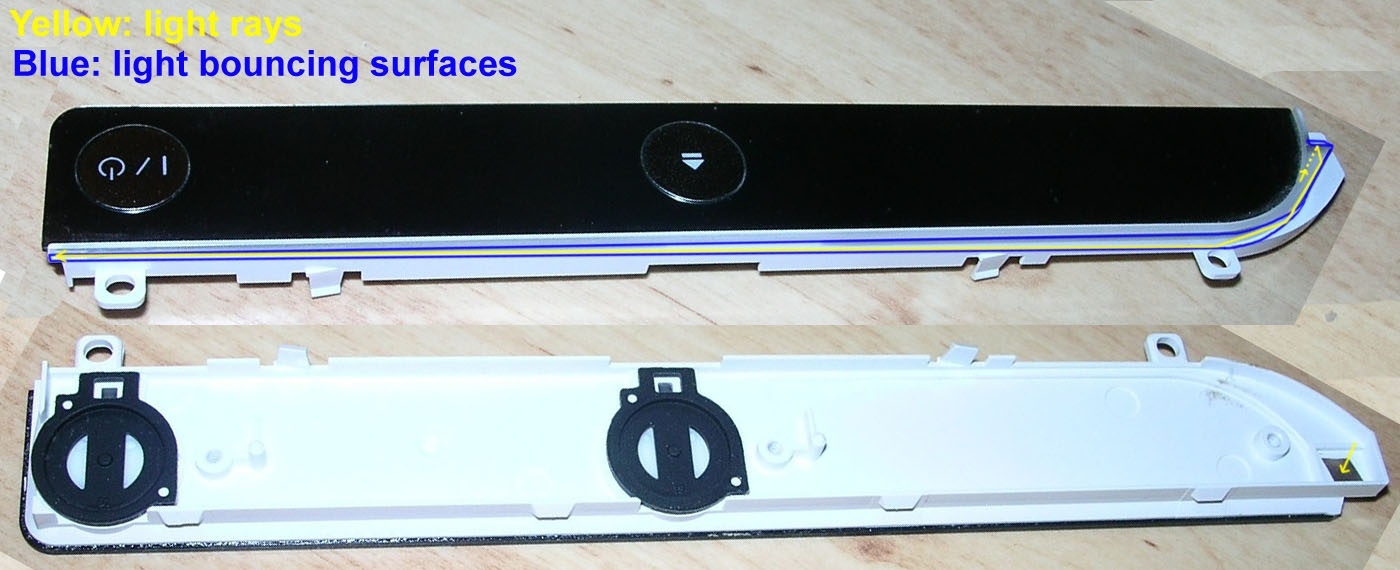
The real problem to make the mod that initiated this thread originally is that only the CECH-20xx, CECH-21xx, and CECH-25xx have this plastic part made with transparent materials
Power_Eject_board_PS3_2000_series_%28light_rays_schematic_in_contour_leds%29.jpg


I painted some arrows in it to try to show how the light rays "bounces" inside the transparent line
Is a bit like the optical fiber cables... the difference is the optical fiber cables doesnt allows the light to "leak"
But we are having a lot of leak, lol... look at the photos, the light only fills 1/6 of the bar

One of the things i tryed to improve that is to use a very thin "metalic" sticker i cutted and placed all along the light bar
For some reason it didnt improved the "bouncings" of the light.... but looks fine because it can be seen a bit of the "metalic" effect externally, not specially awesome, but an small detail :)
I tryed it too with stickers of other colors (yellow was looking cool), try it :)

Edit:
I also tryed with a sheet of paper (so it was a pure white) and was looking cool too because what you see from outise is not exactly a pure white, the best adjetive that describes is a "difused" white, the transparent plastic bar "soften" it a bit
 
Last edited:
After that i thought in lubing the edges of the shells with a bit of "vaseline paste"

Seriously WTF? First the 2 PS3's 1 HDD, Now this......:rolleyes: I am starting to get a bit worried here...... :-p:D @Naked_Snake1995 , sandungas is at it again.....:rolling:

You are not going to believe it now, but after writing my last post i took a look at the PS3 and realized about the disalignment of the bluray drive slot, heheh
You are right, if the top shell is going to be raised (not much just 1 or 2 milimeters) then the bluray drive needs to be raised in the same amount too, right now i dont remember well how is the bluray at bottom (i never took a look at that with interest) so i cant imagine how is the best way to do it, but it should not be much hard

The thing with the BD Drive is that it sits nice and snug where its at and is screwed down at the back. This is to stop vibrations when the Drive is spinning up. Too much excess in that and it will destroy the alignment of the laser and also if its vibrating to much when the disc is spinning the laser will probably not be able to read the disc and shake the drive internal mechanics to bits. The whole drive would need to be raised and so would the mounts. Some plastic washers for the screw and some decent density rubber for were the bd drive sits should be good enough for that, the same rubber that's normally used on the feet of things, say getting some spare PS3 rubber feet and cutting them so they are perfectly flat would be good enough. Or the same type of foam that is on top of the BD drive anyways, that should work as well.

Another thing i thought is the PS3 slims has squared "air vents" all along the sides (aiming to down), this is an alternative way to do it more simple, it will not be a "ring of light all around" like you was mentioning thought

I was looking at them and thinking about it, good for some else but not for me as my PS3's are all vertical to allow for good airflow into all the vents as you can see from the pics. Would still give a good effect though.
 
Btw, if some of you make a (very good quality and huge size) photos of both sides of the DSW-001 board i can make some drawings to show you how that circuit works
I know this boards from memory because the amount of time i spent looking at the HSW-001 so im sure im able to describe the whole circuit of DSW-001 just by looking at the photos :)
https://www.mediafire.com/file/vkaft7xfxblm6l8/DSW-001.rar/file
DSW-001 Board pics taken with a Nikon D3100. 4608 X 3072, that should be enough right?
 
Back
Top