Major Updates
.
- UPDATE (Mar. 25) - new uf2 hotfix(Forum Link)
- UPDATE (Mar. 18) - About (qCFW) for 4.93 FIrmware Update (Forum Link)
- UPDATE (Feb. 20) - PS3HEN 3.4.2 Open Beta: Test #1 Released - (Forum Link)
- UPDATE (Feb. 20) - qCFW updated (forum link) -- qcfw-20260220-release (github link)
- UPDATE (Feb. 17) - qCFW and Future potential (Forum Thread) by @aomsin2526 >here<
- UPDATE (Feb. 13) - BadWDSD/qCFW + HW Flasher/NoBT (Forum Thread)
- UPDATE (Feb. 11) -
qCFW files have been temporary removed from github by the developer, due to a bug, see @aomsin2526 's post > here < & > also here < - UPDATE (Feb. 3) - PS3HEN v3.4.1 (STABLE) has now been released by @esc0rtd3w , graduating from the 3.4.1 BETA builds. (Note: v3.4.1+ is required for qCFW)
.
Original Article (Jan. 30): The evolution of PlayStation 3 (PS3) exploits rides high in 2026, In early-mid 2025 we seen developer and researcher @aomsin2526 (aka Chattrapat Sangmanee) show us a hardware exploit that provided some additional power to PS3HEN with the disclosure of the BadHTAB hardware exploit. The hardware exploit was soon replaced with another hardware exploit also from @aomsin2526 that we know as BadWDSD. While BadHTAB provided some additional functionality to PS3HEN like OverClocking & Linux Support. BadWDSD would proved to be the better foundation needed for what would become the next phase of the overall project.
Focusing now on the software side, the next phase from @aomsin2526 came in the form of a "qCFW" , this was a CFW that was built using Evilnat 4.92 PEX for the late Slim (2500) / SuperSlim (NOR) model PS3 Console's !!! While PS3HEN provided those once dubbed "nonCFW models" with many CFW like feature's, there were a number of abilities that were restricted to only CFW user's. Now with the release of BadWDSD with qCFW that gap has shrunk considerably to where 99% of CFW task can now be done on a qCFW installation. The process for installation of a qCFW is different then the traditional PUP installation of a Firmware, but you will still be running what is essentially a ("quasi") custom firmware running the cobra payload and based off Evilnat PEX CFW. Allowing for even DEX features on a SuperSlim (NOR) + Slim (2500).
PS3HEN developer @esc0rtd3w also had some work in this project as PS3HEN is essential in the installation/operation of qCFW/BadWDWD. You must be running v 3.4.1 Beta-test #4 or higher for support of the latest qCFW installation. Checkout this hardware/software modification that will supercharge thoseSlim 2500/3000 & Superslim (NOR) models. Take note of your SuperSlim model as the eMMc models are not supported.
-
Always view official link for latest updates: https://github.com/aomsin2526/BadWDSD
.
BadWDSD
.This is a hardware modchip for Sony PlayStation 3. By using Raspberry Pi Pico (RP2040), It is possible for non-CFW compatible models to boot qCFW.
Supported models
- All CECH-2500
- All CECH-3000
- CECH-4x00 with NOR flash
-

Models not Supported
- CECH-4x00 with eMMC flash is NOT supported
-

Notice:
- One way to know if your console is eMMC or not is enter safe mode. If you see Change system storage option, It is eMMC.
- Other way is try to install Stagex. If it says Flash is not NOR then it is eMMC.
-
.What is qCFW?
.You still can't install CFW PUP, so new variant of CFW must be made. This is called quasi-CFW.
It is heavily based on Evilnat PEX CFW. And will support every feature except: Dumping eid_root_key and anything that needed it.
Note: Cobra must be active at all times or some feature will not work properly.
qCFW quirks
- For some unknown reason, When you turn on the console using wireless controller it won't sync. You must power cycle the controller for it to sync.
Note on DEX mode
- DEX mode is fully supported. But any kind of firmware installation or update is not possible while in this mode.
- This means if you somehow need to reinstall the firmware such as corrupted HDD, you are stuck.
- To recover, use BANKSEL pin on the modchip to go back to OFW.
-
Installation (Software)
.
FOR FIRST INSTALLATION, BACKUP FLASH FIRST!!!.
IF SOMETHING GOES TOO WRONG AND YOU DON'T HAVE BACKUP, YOUR CONSOLE MAY BE PERMANENTLY BRICKED
- Prepare the USB drive by DELETING old qcfw folder if existed, DO NOT OVERWRITE!! then download qCFW and extract it into your drive like this:

- Install PS3HEN 3.4.1 or later
- Plug your USB drive into RIGHTMOST USB port of your ps3
- On XMB, Enable HEN then use Network -> Hybrid Firmware Tools -> qCFW Options -> Install Stagex option. It must show Success
- If not already, Install the modchip by following Installation (Hardware) section
- After modchip installed and power plugged in, wait until LED of modchip becomes solid. If it doesn't solid after a while, check SC_RX/SC_TX wire
- Turn on the console. modchip LED should flash briefly with triple beep right after. This means exploit is successful. If your console keep turning off and on, check CMD/CLK wire and Stagex
- You should be on XMB now. now Enable HEN then use Install qCFW option
- If it tell you to reinstall firmware and try again, do it ONCE.
- Your screen will appear frozen. it is installing. This process take 10-20 minutes. If something goes wrong during this step, you should be still able to recover by entering safe mode and reinstall firmware normally
- Then it will reboot itself. you should be on qCFW and see Evilnat logo now.
- Congrats! qCFW installation is complete
- From now on, modchip will be required to boot the console until you go back to OFW again
- This can be done by reinstalling OFW/HFW firmware normally. Then after this you can disable or uninstall the modchip
- If thing goes too bad to the point of not being able to enter safe mode at all, you can use BANKSEL pin instead.
- If you flashed bad Stagex.bin or CoreOS.bin, see Recover from bad Stagex.bin or CoreOS.bin flash section.
.Currently, Raspberry Pi Pico (RP2040) and RP2040-Zero are supported.
- Only install modchip after Stagex is installed to console flash from above section.Otherwise it won't boot,
- if you already installed the modchip, You can use HOLD pin to temporary disable the modchip without unsoldering it.
Since I don't have 2500 and 3000 model to test, it must be done by other people. If you know the solder location please tell me. Thanks.
Pico
RP2040-Zero
3000
4x00


- To flash .uf2 file (it is included in qCFW zip), simply connect modchip USB port into your PC while pressing BOOTSEL button. Then new drive will appear, simply drag .uf2 file into it.
- You should see LED blinking. Flash successful and ready to use. You can disconnect it from your PC.
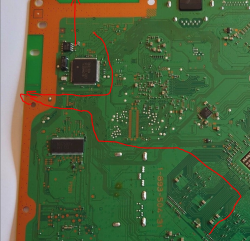
- Exclude power and ground, you only need to solder 4 wires that marked red (CMD, CLK, SC_RX, SC_TX). Other pin is optional.
- It is possible to power the modchip using external power as long as it is active during ps3 standby
Pin description
SIGNAL PIN:
CLK - XDR CLK signal
CMD - XDR CMD signal
SC_TX/SC_RX - Syscon UART signal
DEBUG - Optional modchip UART signal, for debugging and accessing syscon (baud 576000, NOT 57600!)
CONFIG PIN:
Short to ground to activate
HOLD - Disable the modchip without needing to remove power or unsolder
LITE - TODO
BANKSEL - Go back to OFW forcefully. It is equal to syscon command w 1224 00. Only use when absolutely needed. You can't turn on the console while this pin is shorted -
Update qCFW
- You can't update qCFW while on qCFW. you must go back to OFW first.
- Simply reinstall firmware normally, then use Install qCFW option with updated files on USB again. No need to do anything else
- When updating files on USB, delete whole qcfw folder first. Don't overwrite or it may causes problem.
Go back to OFW using PUP method (Recommended)
- Always use this method when possible. Simply reinstall firmware as normal. No extra steps required.
- If you want to uninstall the modchip, you can do so after this
Go back to OFW using BANKSEL pin
Avoid this unless absolutely needed.
DO NOT GO STRAIGHT TO THIS PIN WITHOUT TRYING TO BOOT THE CONSOLE WITHOUT MODCHIP FIRST!, IF IT SHUT IFSELF OFF, THEN YOU CAN FOLLOW BELOW
- Unplug your console
- Short BANKSEL pin to ground
- Plug in your console, wait until modchip LED flashes very fast. Then it is successful. You can't turn on the console while this pin is shorted
- Unplug your console and unshort the pin. If necessary remove or use HOLD pin to disable the modchip
- Plug in your console again and turn it on, you will likely to get black screen. This is expected since dev_flash is still qCFW but you're on OFW now
- Enter safe mode and reinstall firmware normally to get full recovery
Recover from bad Stagex.bin or CoreOS.bin flash
- No worries, your console isn't really bricked.
- FIRST, disable the modchip then try to boot the console if it boots then all is good.
- If it shut itself off, Simply follow Go back to OFW using BANKSEL pin section above. But this time disable modchip before boot as well.
Downgrading
- After booting the console with modchip, It is possible to downgrade the firmware up to 4.80. It can't be done in XMB. You must use safe mode.
-
OtherOS
It is different from CFW. Simply follow these steps.
- Download dtbImage.ps3.zfself and put it into root of your USB drive
- Plug your USB drive into RIGHTMOST USB port of your ps3
- On XMB, use Network -> Custom Firmware Tools -> OtherOS Tools -> Install OtherOS (qCFW) option. It should show Success
- Use Boot OtherOS (qCFW) option. It should enter petitboot right away
Accessing Syscon
You can't access syscon the old ways anymore. It must be done through modchip. Simply connect DEBUG pin of modchip into your UART adapter.

-
NoBT
- TODO. It requires LITE pin and hardware flasher for first installation if you are already on update loop.
eMMC Support?
In very short summary, What modchip is doing is writing these code into ram at boot:
Code:stage_entry: // Jump to 0x2401F031000, aka 0x31000 on NOR flash where Stagex.bin is stored bl 4 mflr %r3 addi %r3, %r3, -4 ld %r4, 24(%r3) mtctr %r4 bctr .quad 0x2401F031000
Do we have something like 0x2401F031000 on eMMC? If answer is yes, then eMMC can be supported (with more porting work).
-
Always view Official Link for latest updates:
- Stable Releases: https://www.psx-place.com/threads/ps3hen-official-release-thread-homebrew-enabler-for-the-ps3.23955/
-
Beta Releases: psx-place.com/threads/ps3hen-open-beta-testing-for-advanced-users-only.373639
.
If you have Auto Updates turned on, then HEN will automatically update the next time its enabled. If not, use whatever other method of your choosing to update. The ps3xploit.me site has been updated.
CHANGELOG
HEN Plugin Changes
- Added detection of BadWDSD via LV1 peek check on hen enable (thanks aomsin2526)
- Enabled LV1 peek and poke to support BadHTAB and BadWDSD exploits (thanks aomsin2526)
- Added conditional timer for Retail and NPDRM self to reduce hanging when launching homebrew (thanks Joonie, aomsin2526)
- Added support for 3k3y/Redump ISOs on-the-fly (thanks Joonie, Evilnat)
- Added support for installing qCFW with xai (quasi-CFW for NOR 3000x and SS) (thanks aomsin2526)
- Added BD Game Disc Fix (thanks LuanTeles)
- Now using fork of Evilnats xai plugin as base to take advantage of updated features (thanks Evilnat)
-
qcfw-20260220-releaseBased on Evilnat 4.92.2 PEX
qCFW Changelog:
- Stagex code improvements
- Implement controller sync workaround. If you turn on the console using controller while on qCFW it will always power cycle once first (.uf2 must be updated)
- Fix a loophole that can made BANKSEL useless under certain circumstance
- Code improvements
- Better self retry/power cycling
- Handle controller sync workaround
- Modchip now runs at stock clock speed (no longer overclocked)
.uf2 update is optional but RECOMMENDED or controller sync workaround may not work properly.
Project Links- BadWDSD Project @: github.com/aomsin2526/BadWDSD
- PS3HEN Release Threads: BETA / STABLE
- qCFW Release Page: https://github.com/aomsin2526/BadWDSD/releases/tag/qcfw-20260202-release
- BadWDSD/qCFW + HW Flasher/NoBT Thread - psx-place.com/threads/....
- qCFW and Future potential (Forum Thread) psx-place.com/...
Last edited:
 I did some continuity tests on the CMD/CLK lines and they're good. The fail was at the connector I used for the CMD/CLK line to the Pico. ARGHHH!!! I Rechecked everything and now it finally powers up with the three beeps.