PS3#7 Continued...
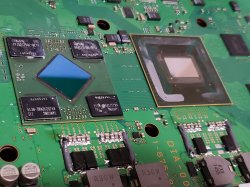
(RSX Reflow)
This morning I reflowed the RSX. This attempt went really well, my best yet! I think I finally figured out how to keep the drafts from getting under tho MB while it's heating. I didn't want to allow air from my vent fan to be able to be pulled under the mother board. So I covered the whole board and IR preheater plate with Aluminum foil. Just the top of it, the vents to cool the preheater I left open, so the preheater's electronics can stay cool, but the air could only be pulled over the motherboard, which was covered in aluminum foil. Only the RSX was exposed. That's so I could use the hot air station with a 45x45mm BGA nozzel to heat it. However, while the board was baking and preheating, I used another piece of foil to comp,etely cover the top. That kept the temps on the top and bottom side within 20C of each other throughout the whole process. The idea is to minimize the temp difference, so it doesn't warp.
I spent the first hour at about 95C driving off the water. I know that
@squeept likes to bake his boards for 24 hours, but IMO that's not entirely necessary. Moisture in the board boiling off actually takes heat with it and keeps the board cooler than the boiling point. Once the moisture is gone the temps begin to rise. That's when I know the board is dry. I live in a place with high humidity too, although today it's more like 40%. I noticed that after about 45 minutes at 95-100C the temps started to rise. I gave it a full hour just to be safe.
After the bake, I raised the preheater temp to to a setting that brought the bottom side probe to 150C. Once the temps stabilized I added amtech flux around the edges of the RSX, until it was thoroughly wet. Then I turned on the Hot air to begin raising the topside temps. This is where patients and practice come in. I raised both the hot air and preheater together until the board and topside read about 180C. Then I began raising the hot air only. At about 200C the RSX flowed and I confirmed this by nudging it gently with my forceps. Once I confirmed it was flowed I dropped the hot air to 200 which cooled the RSX pretty quickly. I estimate the RSX was above 190 for about 30 seconds to a minute tops. Then I moved the Hot air away and covered the top with aluminum foil again. The board was about 180C at this point.
I began the cooling cycle now by setting the preheater down to 150C and let it cool from 180C to 150C over 5-10 minutes. Then from 150C to 120C over the next 10 to 20 minutes. Basically, I'd set it down about 20-30C from it's previous setting and let it cool as long as it took to reach the set point, then set it down another 20-30C. Once it got below 100C I placed a hand towel over the foil to insulate the topside more and set it down to 50C. I waited until it reached 50 and turned the preheater off. Each time it took about 10-20 minutes to cool and all totaled it took maybe 1hr to1.5hrs to cool to room temp.
To clean the flux residue I used a combination of Acetone, electronic contact cleaner, and 99% IPA. I cleaned off the easy to reach Flux residue with IPA and cotton tipped applicators first. The stubborn burned on flux with acetone (goo gone). To get the flux underneath the BGA I used electronics contact cleaner, some really harsh chemicals in a spray can. But it has a tube and I can place the MB at an angle and run the fluid down the slope behind the RSX to get the flux out. I just placed a Paper towel underneath the bottom edge of the RSX as I did to soak up the solvent and dissolved flux that ran out from underneath. I flipped the board 90 degrees and repeated many times. Then I did the same with acetone. and again with IPA in a spray bottle. Lastly I went back over the whole board with IPA and a tooth brush to get every nook and cranny clean. I placed a paper towel over the board and ran the toothbrush over the top of the towel to soak up the IPA (if you let it dry on the board there will be a white residue from the dissolved flux). I repeated until I was satisfied it was thoroughly clean! Then I used compressed air to blow all the hiddin moisture out from underneath all the chips and caps (there's alot). It dried up pretty quick, but I caught alot of it with a paper towel. I touched up any white residue spots I missed with a cotton tipped applicator and IPA.
I have to say, the cleanup process is the most tedious part. I envy
@squeept's ultrasonic IPA bath and drying oven...lol!
I confirmed with a multimeter that my solder was still intact on the Tantalum arrays and they were fine. I did cover these well with aluminum tape and foils to hopefully shield theyr solder from flowing. It seemed to work. Both CPU and RSX had about 3 to 3.5 ohms of resistance +/GND rail. That's healthy.
Results:
The console fired up immediately no problem and has been stress testing while I type this up. About an hour so far. No errors to report. I have not heard the fan ramp up beyond the second step and there are no graphical artifacts. I will continue testing, complete with cool down cycles to allow the board to relax and report back.
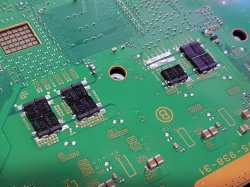
Just to remind you. The CPU has an array of
18x 270uF TaPol and the RSX has
12x 470uF TaPol using the SoulKilla PCB. The console is running fine with all Tantalum now. I have not looked at the oscilloscope, but it should be the same as it was in the last test. Nothing has changed, except the BGA defect is gone.
What's next?
First I need to install a larger HDD. Then I need to jail break, so I can set a custom fan curve. I'm working up a custom fan duct to adapt a Noctua 40mm fan over the power supply. It will duct cool air from the front panel multimedia port, which is useless anyway. I already spliced the fan connector into the BR 12V pwr connector. So it automatically starts spinning when the console is powered up. I just need to finalize the 3D model for the duct. It's very alpha ATM.
The reason for the PSU fan/duct is because I intend to cut a hole in the bottom of the shell to allow cool air to be directly pulled in by the heatsink fan. That works great to cool the CPU/GPU, but it causes the PSU to over heat. So the fan is to prevent that.
I gotta say, I have been messing around with the hardware and trying to fix consoles for so long, I never get a chance to actually play games! So now that I FINALLY have a successful Tantalum system, I will be playing a bunch of games on the console over the next few months. I have been preparing for this day for a long time...lol! I purchased some titles I've been eager to play for the first time. I got the Mass effect and Dead Space trilogy's, which I've never played (6 games). Also I have God of War remaster that I need to play. I never played the original! Besides that, there are a few PS1 and 2 titles I'd like to revisit, so that should be a good test for the system and it's tantalum arrays. I hope it holds up!