Microsoft Windows [Version 10.0.19043.1586]
(c) Microsoft Corporation. All rights reserved.
C:\Users\User\Desktop\PS3 Repair\ps3syscon-master>python ps3_syscon_uart_script.py COM4 CXRF
>$ AUTH
Auth successful
>$ bringup
bringup
[SSM] state: 0000 -> 0101
Bringup Mode #0 (0xFF)
[SSM] ssmCb_OnStartingBePowOn() called.
[SSM] First Boot.
[SSM] Bringup mode : syspm_stat=00000000/00000000
[POWSEQ] PowerSeq_Setup called.
[SSM] state: 0101 -> 0201
[POWSEQ] AV Backend Setup
[SSM] state: 0201 -> 0102
[SSM] state: 0102 -> 0202
[SSM] state: 0202 -> 0103
[SSM] state: 0103 -> 0203
[SSM] ssmCb_BeforeBeOn() called.
[SSM] state: 0203 -> 0104
Psbd_SbTransMode_Half:0x20e2
>$
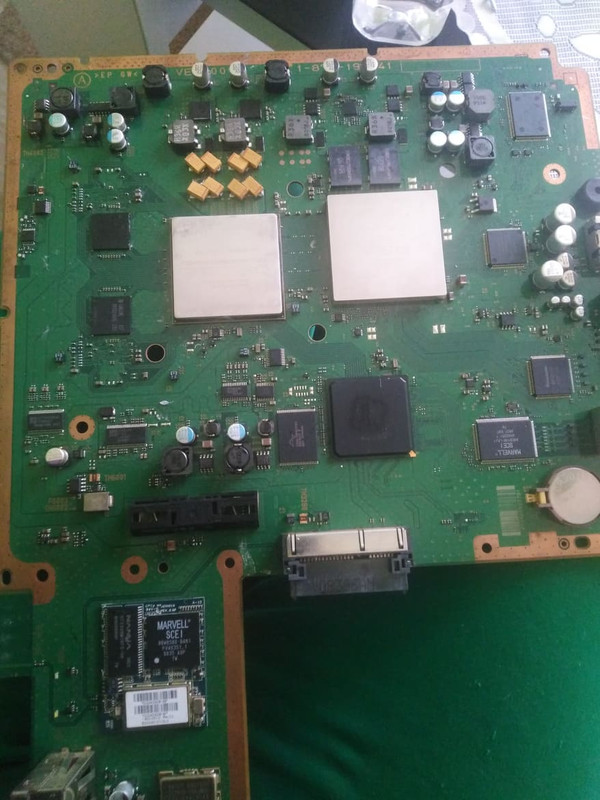
[POWERSEQ] Error : BitTraining BE:RRAC:RX1:GLOBAL1:RX_STATUS
[SSM] state: 0104 -> 0304
[SSM] ssmCb_AfterBeOn2() called.
[SSM] PowSeq Fail : Detected !
[SSM] state: 0304 -> 0700
[POWSEQ] AV Backend Letup
[SSM] Shutdown mode : syspm_stat=00000000/00000000
Wait WmMcCom_DeadEvent timeout
[ERROR]: 0xa0403034
[POWSEQ] PowerSeq_Letup called.
[SSM] state: 0700 -> 0600
(PowerOff State) (Fatal)
[mullion]$
>$
>$ becount
becount
Bringup : 3281 times
Shutdown: 3238 times
Power-on: 168day 15hour 07min 55sec
[mullion]$
>$
>$ errlog
errlog
ofst[ 0]:err_code:0xa0403034, clock:0xffffffff
ofst[ 4]:err_code:0xa0403034, clock:0x0ba6268c 2006/03/12 00:23:40
ofst[ 8]:err_code:0xa0403034, clock:0x0ba62697 2006/03/12 00:23:51
ofst[ 12]:err_code:0xa0403034, clock:0x0ba626a1 2006/03/12 00:24:01
ofst[ 16]:err_code:0xa0403034, clock:0x0ba626ad 2006/03/12 00:24:13
ofst[ 20]:err_code:0xa0403034, clock:0x0ba626ba 2006/03/12 00:24:26
ofst[ 24]:err_code:0xa0403034, clock:0x0ba9edc9 2006/03/14 21:10:33
ofst[ 28]:err_code:0xa0403034, clock:0x0ba9edd7 2006/03/14 21:10:47
ofst[ 32]:err_code:0xa0403034, clock:0x0ba9ede2 2006/03/14 21:10:58
ofst[ 36]:err_code:0xa0403034, clock:0x0ba9edfc 2006/03/14 21:11:24
ofst[ 40]:err_code:0xa0403034, clock:0x0ba9edff 2006/03/14 21:11:27
ofst[ 44]:err_code:0xa0403034, clock:0x0ba9ee07 2006/03/14 21:11:35
ofst[ 48]:err_code:0xa0403034, clock:0x0ba9ee11 2006/03/14 21:11:45
ofst[ 52]:err_code:0xa0403034, clock:0x0ba9ee19 2006/03/14 21:11:53
ofst[ 56]:err_code:0xa0403034, clock:0x0ba9ee21 2006/03/14 21:12:01
ofst[ 60]:err_code:0xa0403034, clock:0x0ba9ee27 2006/03/14 21:12:07
ofst[ 64]:err_code:0xa0403034, clock:0x0ba9ee34 2006/03/14 21:12:20
ofst[ 68]:err_code:0xa0403034, clock:0x0ba9ee43 2006/03/14 21:12:35
ofst[ 72]:err_code:0xa0403034, clock:0x0ba9ee54 2006/03/14 21:12:52
ofst[ 76]:err_code:0xa0403034, clock:0x0baa9649 2006/03/15 09:09:29
ofst[ 80]:err_code:0xa0403034, clock:0x0baa9659 2006/03/15 09:09:45
ofst[ 84]:err_code:0xa0403034, clock:0x0baa9665 2006/03/15 09:09:57
ofst[ 88]:err_code:0xa0403034, clock:0x0bab7e0d 2006/03/16 01:38:21
ofst[ 92]:err_code:0xa0403034, clock:0x0bab7e16 2006/03/16 01:38:30
ofst[ 96]:err_code:0xa0403034, clock:0x0bae0021 2006/03/17 23:17:53
ofst[100]:err_code:0xa0403034, clock:0x0baf4f37 2006/03/18 23:07:35
ofst[104]:err_code:0xa0403034, clock:0x1da22358 2015/10/03 05:25:44
ofst[108]:err_code:0xa0403034, clock:0x1da2236f 2015/10/03 05:26:07
ofst[112]:err_code:0xa0403034, clock:0x1e4edc67 2016/02/11 05:45:11
ofst[116]:err_code:0xa0403034, clock:0x1e4edc77 2016/02/11 05:45:27
ofst[120]:err_code:0xa0403034, clock:0x1e514caa 2016/02/13 02:08:42
ofst[124]:err_code:0xa0403034, clock:0xffffffff
[mullion]$
>$
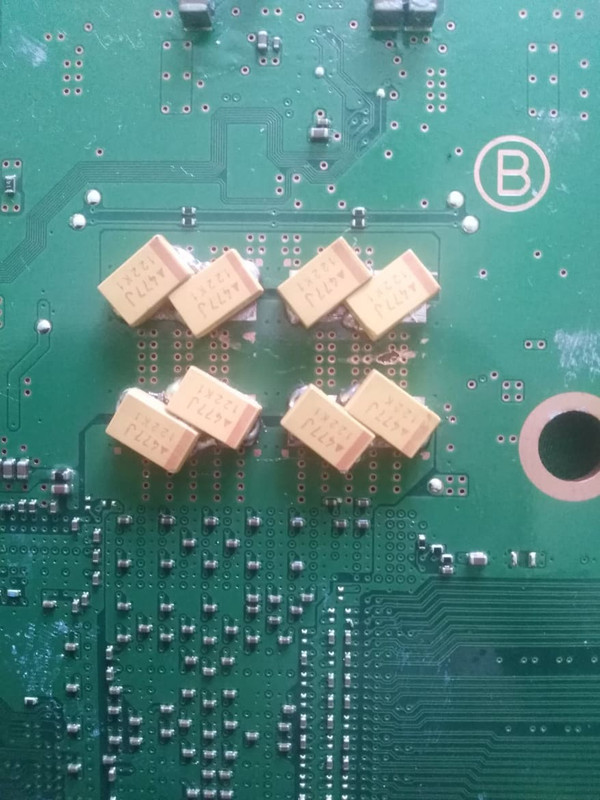
 Ah nice! Well, if ever you decide to change your AVX Tans, you'll want to get these Panasonics instead:- 2R5TPE470M7


 hehee
hehee