You are using an out of date browser. It may not display this or other websites correctly.
You should upgrade or use an alternative browser.
You should upgrade or use an alternative browser.
PS3 (Research/Experimental) - NEC/TOKIN Capacitors Replacement - YLOD
- Thread starter Naked_Snake1995
- Start date
Cheshire UK
Member
If you remove every Nec Tokin is it required to bridge every of them? Sometimes i see 2 wires one for the RSX and one for the CPU but then i see others that have used 4 wires on each side. 4 on top and 4 on the bottom.
I believe replicating what the NEC Tokins have in place for the circuit would be the best approach, I just do 4 wires on the top and 4 wires on the bottom.
Cheers,
M
Gosh, today I am awfull typping things here ... so many edits!
Just to add that when I/one uses Tantalizers boards like the one from Rip Felix, ACE, other, no need to add any bridging wire.
Nowadays I "favour" the ACE board - a single board holds 6 (six) capacitors and much easier to solder them in (in my opinion) - even though the version I use dont have the option to add the extra ceramic caps.
Last edited:
Hi everyone!
I'm looking for help with repairing my ps3. Currently, me and a few friends are trying to revive a console that YLOD'ed back in 2014/2015. We've read a lot of forums and posts and decided to replace the NEC/Tokins (we got errors 1002 and 2124 via syscon) with rip felix's Tantalizers and their respective capacitors. Before their replacement, my ps3 would shut itself off immediately after pressing the button to turn on. Now we have new issues...
First time we tried to boot the console, the fan ran really loud and after a few seconds the ps3 turned itself off (no output to monitor)
Afterwards, we tried again and this time the console seemed to run fine? We didn't get any image on the monitor (so perhaps we need to change the hdmi since we also got a 2124 on the syscon errlog) but noticed the monitor "recognized" something when we booted the console. But, after 10-15 minutes, the console shut itself off again.
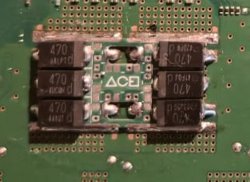
The third time we tried to boot, the console shut itself off and we spotted smoke coming from the console. After tearing it apart we pinpointed the smoke coming from one of the components near the tantalizers (Picture below).
From then on, sometimes the console doesn't even show the red light while on standby, other times it does, and we can't keep it running for more than a few seconds.
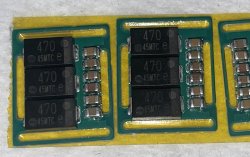
I'll also leave pictures of the tantalizers installed on the board as we are afraid we may have done something wrong while soldering them (this was our fist time working with components of this size and our skills are mediocre at best :/ ). We replaced all 8 nec tokins.
Unfortunately we did not have any scart cables to test if we had any image output when the console ran for 10-15mins on our 2nd attempt.
Also, two of the tantalizers are missing 1 ceramic capacitor each (the component from where the smoke was being released was near one of these two tantalizers missing 1 cap. Maybe it's related?)
Is this board now a lost cause? Is it even worth it to check another errlog? Anybody had a similar issue like this in the past?
Thanks in advance and best regards to all!


I'm looking for help with repairing my ps3. Currently, me and a few friends are trying to revive a console that YLOD'ed back in 2014/2015. We've read a lot of forums and posts and decided to replace the NEC/Tokins (we got errors 1002 and 2124 via syscon) with rip felix's Tantalizers and their respective capacitors. Before their replacement, my ps3 would shut itself off immediately after pressing the button to turn on. Now we have new issues...
First time we tried to boot the console, the fan ran really loud and after a few seconds the ps3 turned itself off (no output to monitor)
Afterwards, we tried again and this time the console seemed to run fine? We didn't get any image on the monitor (so perhaps we need to change the hdmi since we also got a 2124 on the syscon errlog) but noticed the monitor "recognized" something when we booted the console. But, after 10-15 minutes, the console shut itself off again.
The third time we tried to boot, the console shut itself off and we spotted smoke coming from the console. After tearing it apart we pinpointed the smoke coming from one of the components near the tantalizers (Picture below).
From then on, sometimes the console doesn't even show the red light while on standby, other times it does, and we can't keep it running for more than a few seconds.
I'll also leave pictures of the tantalizers installed on the board as we are afraid we may have done something wrong while soldering them (this was our fist time working with components of this size and our skills are mediocre at best :/ ). We replaced all 8 nec tokins.
Unfortunately we did not have any scart cables to test if we had any image output when the console ran for 10-15mins on our 2nd attempt.
Also, two of the tantalizers are missing 1 ceramic capacitor each (the component from where the smoke was being released was near one of these two tantalizers missing 1 cap. Maybe it's related?)
Is this board now a lost cause? Is it even worth it to check another errlog? Anybody had a similar issue like this in the past?
Thanks in advance and best regards to all!
iVirtualZero
Member
Hi everyone!
I'm looking for help with repairing my ps3. Currently, me and a few friends are trying to revive a console that YLOD'ed back in 2014/2015. We've read a lot of forums and posts and decided to replace the NEC/Tokins (we got errors 1002 and 2124 via syscon) with rip felix's Tantalizers and their respective capacitors. Before their replacement, my ps3 would shut itself off immediately after pressing the button to turn on. Now we have new issues...
First time we tried to boot the console, the fan ran really loud and after a few seconds the ps3 turned itself off (no output to monitor)
Afterwards, we tried again and this time the console seemed to run fine? We didn't get any image on the monitor (so perhaps we need to change the hdmi since we also got a 2124 on the syscon errlog) but noticed the monitor "recognized" something when we booted the console. But, after 10-15 minutes, the console shut itself off again.
The third time we tried to boot, the console shut itself off and we spotted smoke coming from the console. After tearing it apart we pinpointed the smoke coming from one of the components near the tantalizers (Picture below).
From then on, sometimes the console doesn't even show the red light while on standby, other times it does, and we can't keep it running for more than a few seconds.
I'll also leave pictures of the tantalizers installed on the board as we are afraid we may have done something wrong while soldering them (this was our fist time working with components of this size and our skills are mediocre at best :/ ). We replaced all 8 nec tokins.
Unfortunately we did not have any scart cables to test if we had any image output when the console ran for 10-15mins on our 2nd attempt.
Also, two of the tantalizers are missing 1 ceramic capacitor each (the component from where the smoke was being released was near one of these two tantalizers missing 1 cap. Maybe it's related?)
Is this board now a lost cause? Is it even worth it to check another errlog? Anybody had a similar issue like this in the past?
Thanks in advance and best regards to all!
View attachment 46542 View attachment 46543 View attachment 46544[
It looks like you need to go over your solder work, you need to use Flux over you solder joints and will need to touch up each solder joint of the Tantalizer Install.
Ganjo
Member
Hi everyone!
I'm looking for help with repairing my ps3. Currently, me and a few friends are trying to revive a console that YLOD'ed back in 2014/2015. We've read a lot of forums and posts and decided to replace the NEC/Tokins (we got errors 1002 and 2124 via syscon) with rip felix's Tantalizers and their respective capacitors. Before their replacement, my ps3 would shut itself off immediately after pressing the button to turn on. Now we have new issues...
First time we tried to boot the console, the fan ran really loud and after a few seconds the ps3 turned itself off (no output to monitor)
Afterwards, we tried again and this time the console seemed to run fine? We didn't get any image on the monitor (so perhaps we need to change the hdmi since we also got a 2124 on the syscon errlog) but noticed the monitor "recognized" something when we booted the console. But, after 10-15 minutes, the console shut itself off again.
The third time we tried to boot, the console shut itself off and we spotted smoke coming from the console. After tearing it apart we pinpointed the smoke coming from one of the components near the tantalizers (Picture below).
From then on, sometimes the console doesn't even show the red light while on standby, other times it does, and we can't keep it running for more than a few seconds.
I'll also leave pictures of the tantalizers installed on the board as we are afraid we may have done something wrong while soldering them (this was our fist time working with components of this size and our skills are mediocre at best :/ ). We replaced all 8 nec tokins.
Unfortunately we did not have any scart cables to test if we had any image output when the console ran for 10-15mins on our 2nd attempt.
Also, two of the tantalizers are missing 1 ceramic capacitor each (the component from where the smoke was being released was near one of these two tantalizers missing 1 cap. Maybe it's related?)
Is this board now a lost cause? Is it even worth it to check another errlog? Anybody had a similar issue like this in the past?
Thanks in advance and best regards to all!
View attachment 46542 View attachment 46543 View attachment 46544
What does the top side tantalizers look like? You need to remove all of the tantalizers boards and check to see if they are shorted. Then you need to remove those shorted caps on the PS3 board and recheck for any additional shorts. Dumping the syscon is pointless, it obviously has shorts on the board.
Check BE_VDDC and RSX_VDDC resistances or check directly across the tantalum capacitors. Youll likely see 0 ohms. You should have checked it after changing the TOKINs and BEFORE turning the console back on.
Hey man, thank you for the feedback! We will check the boards as soon as we have the chance. Would you say the shorted caps on the motherboard were the consequence of the "poor" installation of the tantalizers?
Ganjo
Member
Yes, since they are all in the same circuit so its likely related. Its possible some solder dropped on the board and created a short, or that missing cap on the tant board loosened/exploded and caused it. I dont notice any shorts with the tantalizers but it could be under the boards or the tantalizers on the other side.
Can you add pics of the other side of the board?
Can you add pics of the other side of the board?
iVirtualZero
Member
Yes, since they are all in the same circuit so its likely related. Its possible some solder dropped on the board and created a short, or that missing cap on the tant board loosened/exploded and caused it. I dont notice any shorts with the tantalizers but it could be under the boards or the tantalizers on the other side.
Can you add pics of the other side of the board?
I made a guide to replacing the NEC Tokins: https://imgur.com/gallery/9C0hCa2
I use plenty of flux on the PCB and the motherboard by solder wicking the lead free solder off of the motherboard, I add some quality leaded 63/37 Solder, the brand I use is Kester, to both the PCB and the motherboard, I then add some more flux and Hot air the Tantalizer PCB onto the motherboard along with the components 1 or 2 capacitors at a time to each PCB, if excess heat is a concern use Kapton Tape around the area your Hot Air Reworking but the PS3's thick motherboard dissipates heat fast. The end result of the install is a factory looking install, just be sure to clean the motherboard with IPA 99% right after. Hot Air Rework skills are necessary for this method of an install.


Last edited:
TriForcer
Member
Hi,
I have some (fully working) BC PS3 (40nm) - one has NEC-TOKIN replaced with TantalACEr-V2.0-without MLCC. I also have loose RIP-Felix tantalizer with MLCC (JLCPCB pre-built). Will the extra filtering preserve Cell/RSX better over time? Should I replace ACE with RIP or try to stick MLCC on the ACE board? Or just leave it as is?
IF I'm going to replace - is it easier/better to remove them (ACE) with hot air and then solder them (RIP) with a soldering iron?
Is it worth the trouble?
Attachments
karenjan99
Member
hi guys, found a VER-001 in poor condition with ylod, get replaced tokins and get glod, after 20-30 sec of powering hdd light up few times. also dont know how but one time it loads, get in xmb and fully worked but after reset the same issue. also powering sensor not beep for try to boot recovery it just beeps one time if he pressed 20 sec and turns off the console
try removing hdd and booting in recovery if works then replace hdd otherwise use uarthi guys, found a VER-001 in poor condition with ylod, get replaced tokins and get glod, after 20-30 sec of powering hdd light up few times. also dont know how but one time it loads, get in xmb and fully worked but after reset the same issue. also powering sensor not beep for try to boot recovery it just beeps one time if he pressed 20 sec and turns off the console
iKon
Forum Noob
Not bad at all, and good info in your tutorial.I made a guide to replacing the NEC Tokins:
I use plenty of flux on the PCB and the motherboard by solder wicking the lead free solder off of the motherboard, I add some quality leaded 63/37 Solder, the brand I use is Kester, to both the PCB and the motherboard, I then add some more flux and Hot air the Tantalizer PCB onto the motherboard along with the components 1 or 2 capacitors at a time to each PCB, if excess heat is a concern use Kapton Tape around the area your Hot Air Reworking but the PS3's thick motherboard dissipates heat fast. The end result of the install is a factory looking install, just be sure to clean the motherboard with IPA 99% right after. Hot Air Rework skills are necessary for this method of an install.
View attachment 46555
View attachment 46556
View attachment 46557
The only thing I personally do a little differently is I pre-populate the tantalizers first, so the amount of rework heat going into the board is kept to a minimum.
For removal, I also like using a cool knife like this, so no added heat is needed for that step. Then I use low-melt solder, around 138°C, on everything. That's just how I've been doing it — not saying it's the only right way, it just feels like a cleaner process to me and keeps board stress down.
That video shows the method I've been using. Thanks again for putting the tutorial together; always good to see more info out there.
Hey guys, quick question: I have a phat Model B here with 1002 and 1003 errors and want to replate the NECs with tantal capacitors (I cant get my hands on a tantalizer in time for my vacation trip) and wanted to know, what gauge wire I need to bridge the positive terminals on the backside of the mainboard?
Similar threads
-
 PS3 Interesting PS3 Errors (1802, 1701, 1601) and Capacitor Replacement
- Started by Cheshire UK
- Replies: 2
-
PS3 CECHA00 with several SYSCON errors (3004, 1001,1002, 2120,3011)
- Started by LSL
- Replies: 7
-
PS3 A0801002 after 4 nec/tokin replacement (maybe Felix or anyone help me)
- Started by Swhalegod
- Replies: 3
-
Hello newcomer to the ps3 modding scene, needing help with syscon diagnostic
- Started by ascendantprime
- Replies: 13